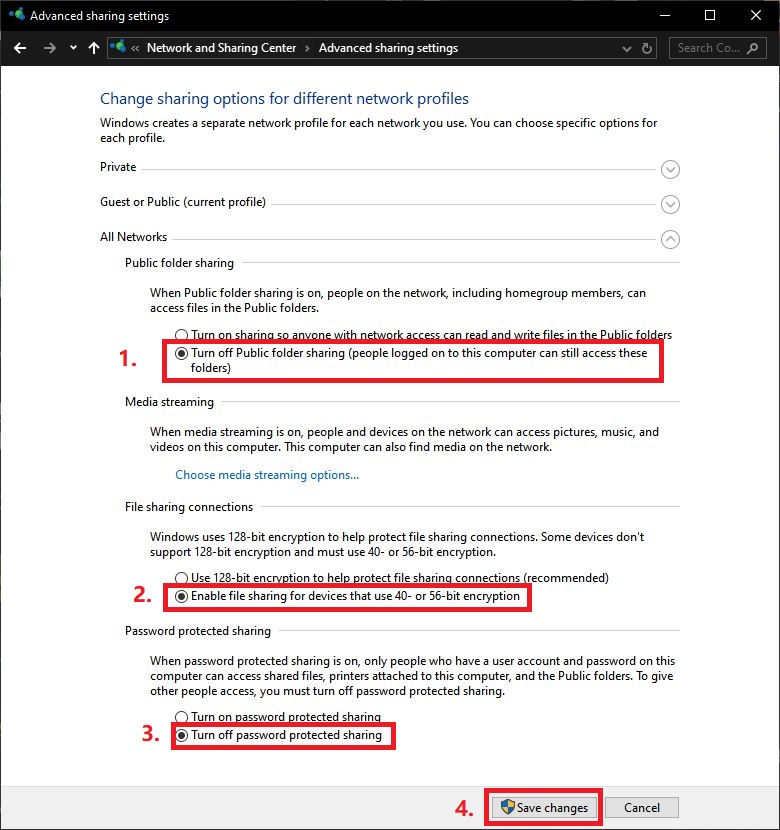
In Windows 11, password-protected sharing requires users to provide valid account credentials when accessing shared files or folders over a network.
If you want other computers on the same trusted local network to access shared resources without entering a username and password, you can turn off password-protected sharing.
This article explains two ways to disable this setting in Windows 11.
Method 1: Via Windows Settings (Recommended) #
Follow these steps to turn off password-protected sharing through Windows Settings.
- Press Win + I on your keyboard to open Settings.
- In the Settings search box, type Manage advanced sharing settings.
- Select Manage advanced sharing settings from the search results.
- Under All networks, look for Password protected sharing.
- Select Off to disable password-protected sharing.
- If a Save changes button is displayed, click it.
Note: The layout and available options may vary slightly depending on your Windows 11 version.
Method 2: Via Control Panel #
You can also disable password-protected sharing through Control Panel.
- Press Win + R on your keyboard to open the Run dialog box.
- Type
controland press Enter. - Select Network and Internet.
- Click Network and Sharing Center.
- Select Change advanced sharing settings from the left-hand menu.
- Expand All networks.
- Under Password protected sharing, select Turn off password protected sharing.
- Click Save changes if the button is displayed.
Password-protected sharing should now be disabled.
Note: Method 1 and Method 2 change the same setting. You only need to follow one method.
Troubleshooting #
If other computers still cannot access the shared files or folders after turning off password-protected sharing, check the following:
1. Make Sure Both Computers Are on the Same Network #
Ensure that both computers are connected to the same local network, such as the same office LAN or trusted Wi-Fi network.
2. Enable Network Discovery and File and Printer Sharing #
To allow computers to discover one another and share resources:
- Open Manage advanced sharing settings in Windows Settings.
- Under Private networks, turn on Network discovery.
- Turn on File and printer sharing.
- Make sure the network is set to Private only when it is a trusted network.
3. Check the Shared Folder Permissions #
Turning off password-protected sharing does not automatically share every folder on your computer.
Make sure the target folder is shared and that the intended users have the necessary sharing permissions and Windows file-system permissions.
4. Check Firewall or Security Software #
Windows Firewall or other security software may block network file sharing. Check that file sharing is allowed on your trusted local network.
Security Note #
Disabling password-protected sharing reduces the protection provided by account-based access controls. Other devices may be able to access shared resources depending on the folder permissions and Windows security settings.
For security reasons, only disable this feature on a trusted private network, such as a home or office network. Avoid disabling it on public Wi-Fi networks.
Always share only the folders that other users need to access.
Conclusion #
You can turn off password-protected sharing in Windows 11 through either Windows Settings or Control Panel.
If network sharing still does not work, check network discovery, file-sharing settings, folder permissions, and firewall settings.
Credit By : Webstation


