Access UBS E-Invoice #
Introduction #
Welcome to Access UBS Accounting, Inventory, and Billing, featuring our innovative e-invoicing capabilities! This User Guide provides comprehensive information and guidelines for all users. Your engagement with Access UBS Accounting, Inventory, and Billing is essential as we aim to deliver a seamless and efficient user experience. Thank you for choosing our platform and contributing to its continuous improvement.
Important notes on Test Mode Version #
- If you prefer not to work directly with your live data, you can access the test mode via the system’s Test Mode icon
 . This will generate a separate folder for your testing environment. In this environment, you may test the transmission of invoices where the Outgoing Dashboard is available.
 - This Test Mode is still currently limited to the local machine and does not connect to the LHDN API.
Prerequisites #
Configuring Middleware Service (IAM) with WorkSpace credentials #
Before transmitting any document to LHDN, please ensure that the following settings are configured:
1. IAM
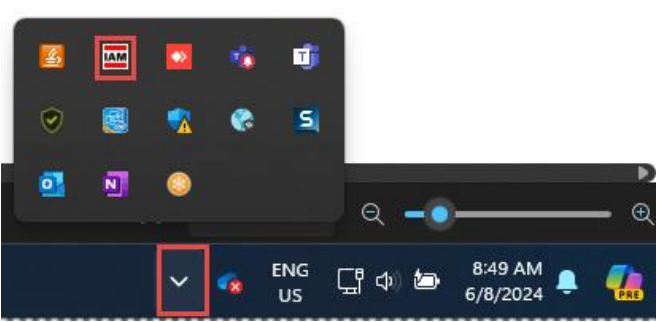
You should be able to see the IAM icon in the bottom right corner of your screen, within the Hidden Icons area
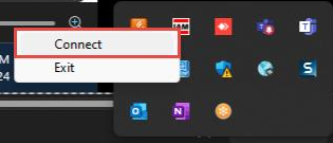
2. Right-click on the IAM icon and select “Connect”
3. You will be redirected to the “Sign in to Asia Inter-Application Messaging” page. Log in using your Workspace Admin Account

4. You should be able to view the following message after successfully logging in.
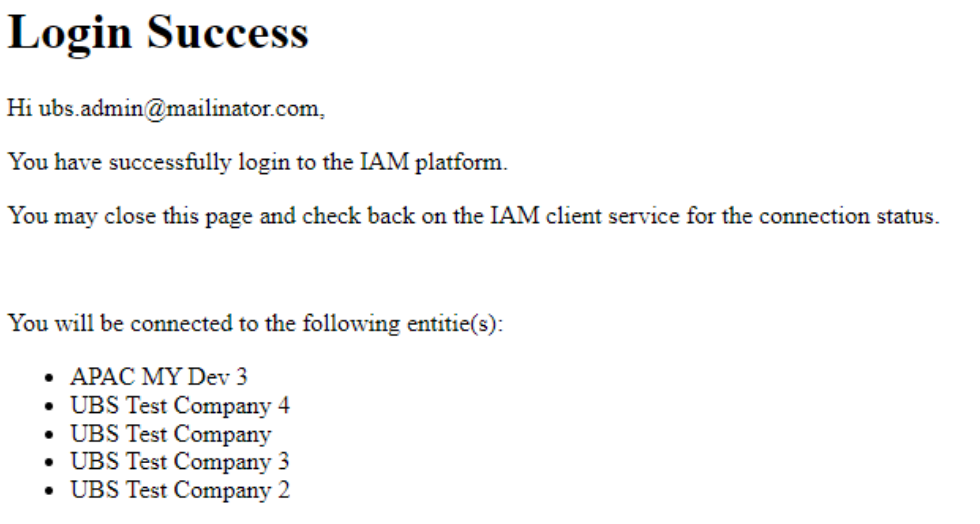
The colour of the IAM’s icon will now change to green

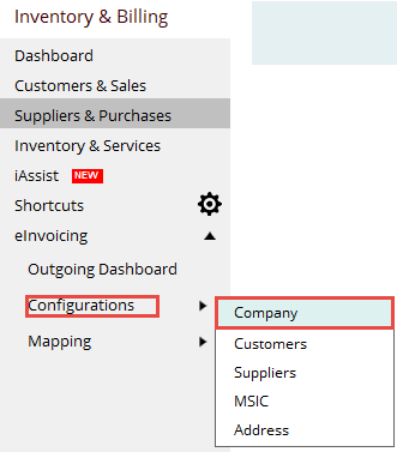
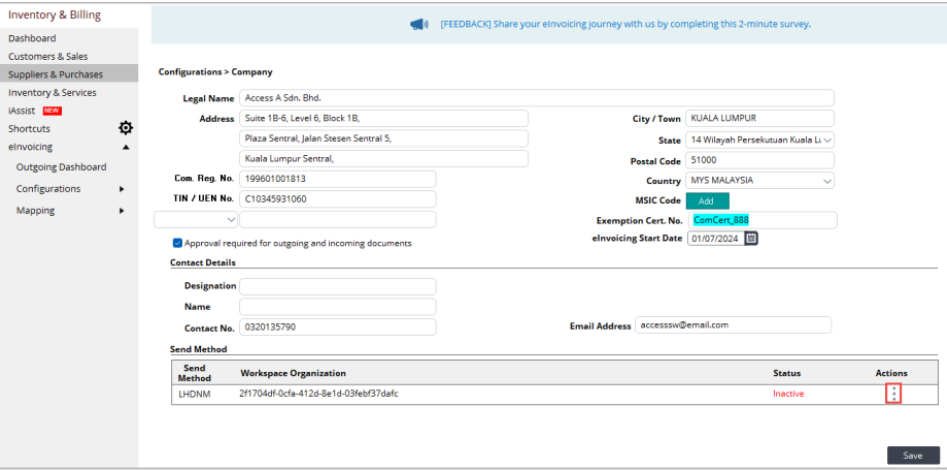
5. Go to UBS…Inventory & Billing / Billing…eInvoicing…Configurations…Company
6. In the “Send Method” section, click the 3 dots button to activate the LHDNM send method.
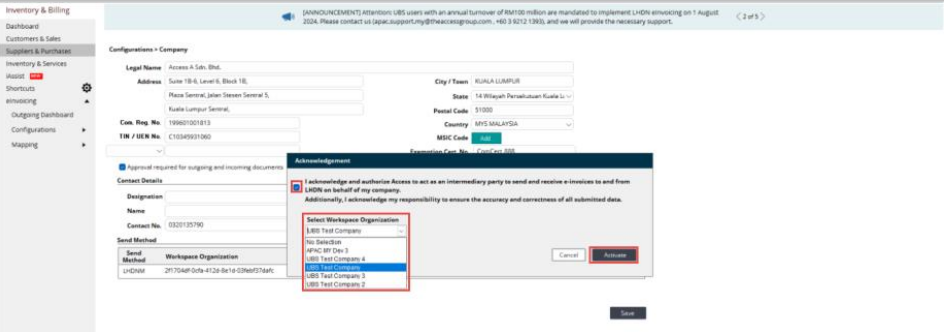
Tick the checkbox for the consent message, select “Workspace Organization”, and click the “Activate” button. Please note that the Workspace Organization list will only be visible if you are logged in to IAM with an Admin account.
Important Note:
1. An admin account is required to configure the Workspace Organization in UBS via IAM.
2. After completing step #1, you can log out from the admin account and log in with a non-admin account for other purposes. This will not affect the configuration done in step #1.
3. To Log out of your current account, the steps are as follows:
a. Do not disconnect IAM
b. Visit https://identity.accessacloud.com/ and sign out of your Admin’s account.
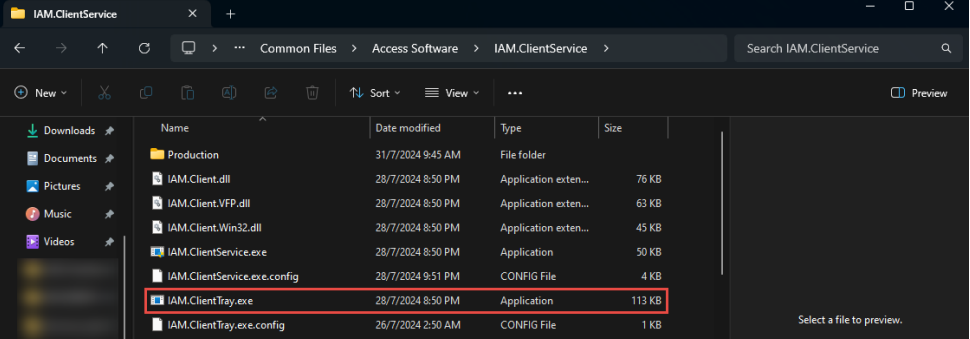
4. After completing the Online Update, you should restart your machine. If you do not see the IAM tray icon in the Hidden Icons area, please navigate to the following path (C:\Program Files (x86)\Common Files\Access Software\IAM.ClientService) and manually launch the IAM.ClientTray application.
Navigating the system #
After successfully updating to the eInvoicing version, log in to your Access UBS solution. On the Landing Page, you will find the Test Mode icon ![]() seamlessly integrated into the Actions panel on the right. This feature allows you to conduct tests on a separate database, ensuring that your live data remains unaffected.
seamlessly integrated into the Actions panel on the right. This feature allows you to conduct tests on a separate database, ensuring that your live data remains unaffected.

Within the Landing Page itself, users can accomplish two (2) essential tasks:
| 1. | To initiate your daily billing and accounting tasks | • click on the company name listed under the “Company Name” column. • The e-invoice setup functions are now accessible for preparation in your live data. • The submission functions remain inaccessible as the LHDN production server has not yet been opened. |
| 2. | To access the Test Mode (TM) version | ➢ click on the TM icon under the Actions panel. ➢The system will automatically generate a separate folder containing replicated company data for your testing purposes, ensuring your live database remains undisturbed. |
Test Mode Version #
After accessing the company through the Test Mode icon, you will observe the following:
• The label  resides on the menu bar indicating the company you are currently accessing is on the Test Mode version and all tasks performed here will not impact the company live date.

eInvoicing Console #
• eInvoicing menu is available on the left panel of your working screen. Click to expand the functionalities to address each phase of your eInvoicing workflow needs.

eInvoicing Console #
Let us go through each functionality to understand how it aids users in setting up the eInvoicing requirements accurately.
Configurations #
In the Configuration section, you can manage crucial elements required for eInvoice as mandated by LHDN. This central hub allows you to perform settings and information essential for the smooth transmission of your e-invoice to the LHDN portal for validation.
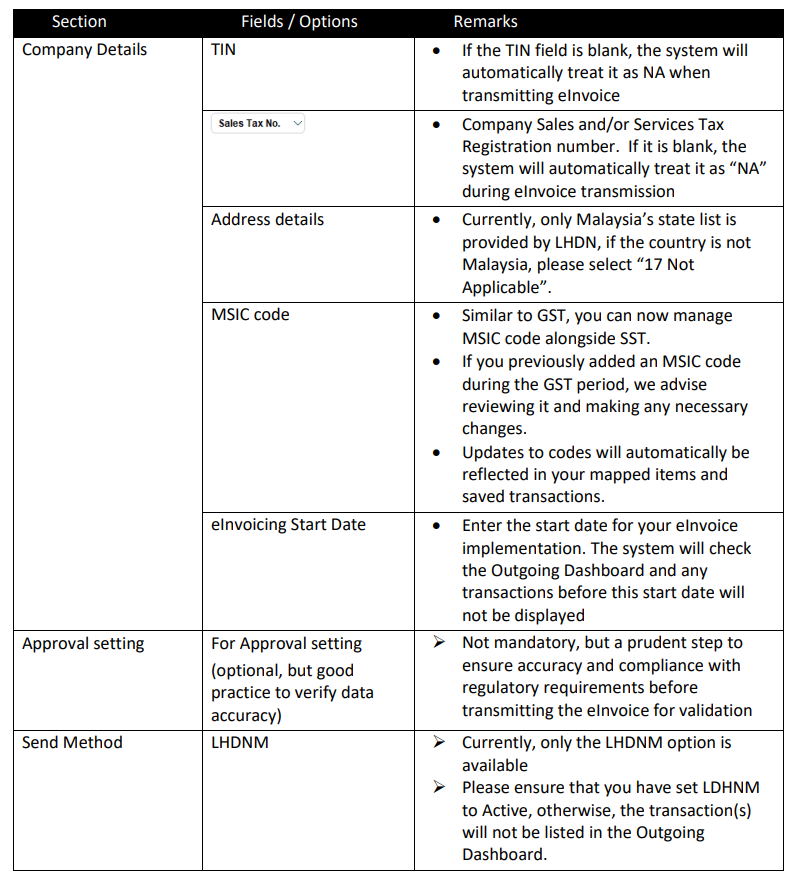
Company #
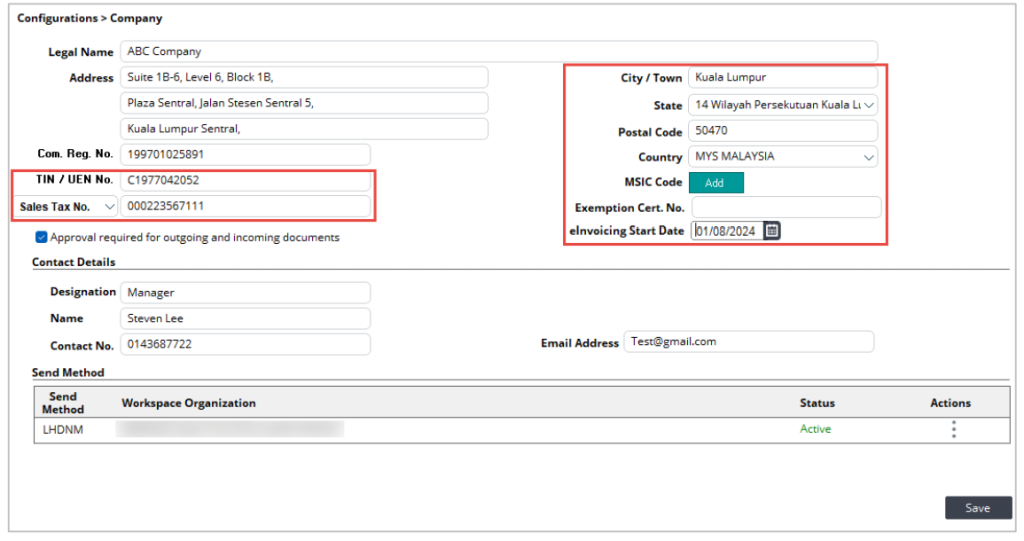
All details from your Company Profile will be automatically filled in on this screen. However, users must complete all other empty fields as this information is necessary for LHDN validation during the eInvoice process.
The company configuration comes in 3 sections:
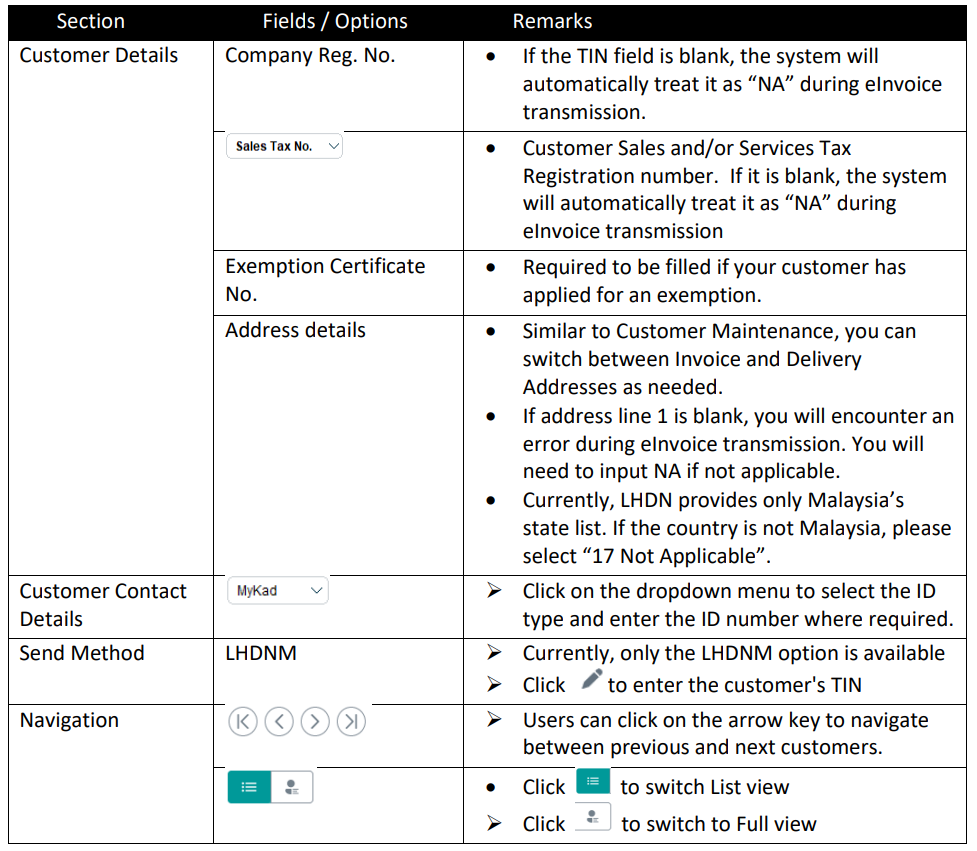
Customers #
This screen automatically displays all customers stored in your Customer Masters, offering a convenient overview of any missing information required for eInvoicing.
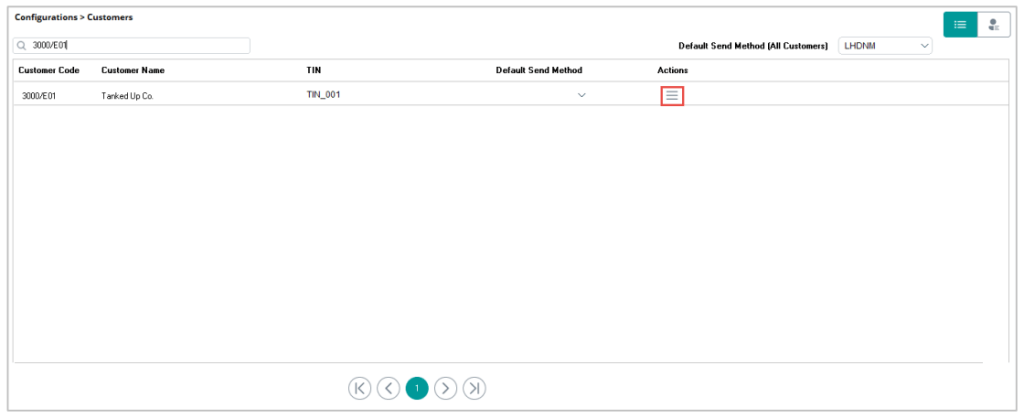
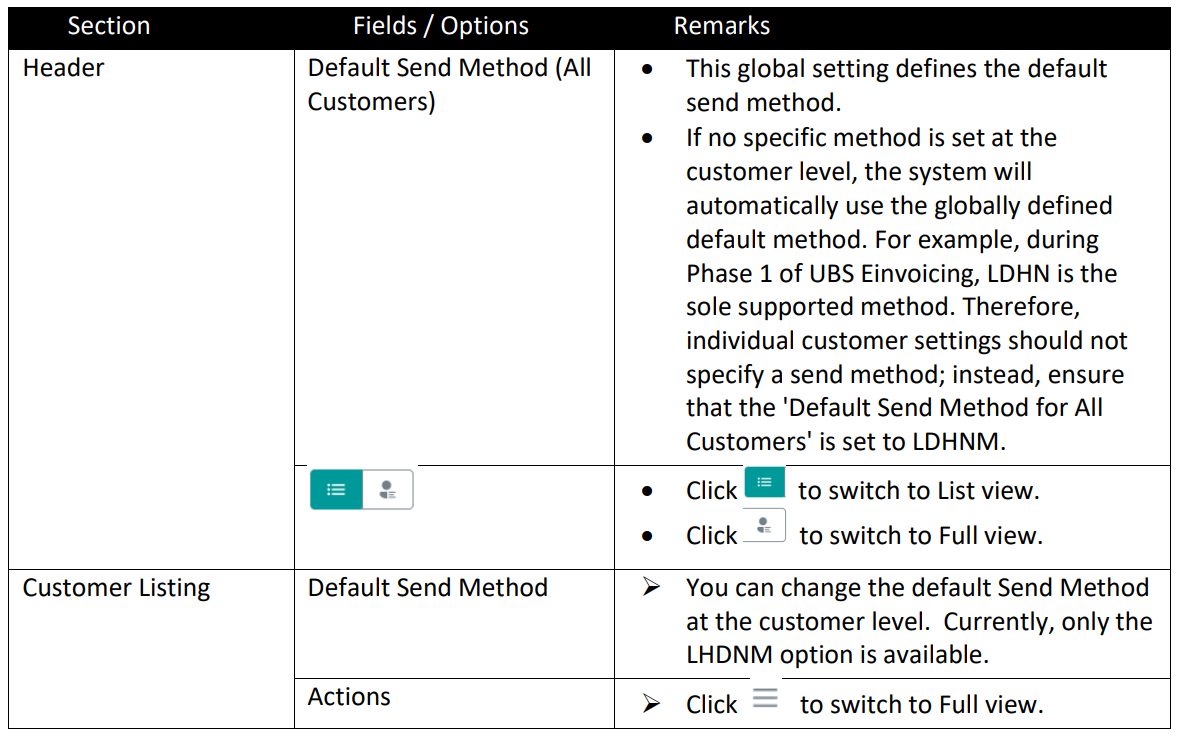
Click on the icon under the Action column to start updating the necessary information for the customers. Customer details will automatically appear on this screen. Make sure to fill in all the remaining fields, as this information is crucial for LHDN validation during the eInvoice process.
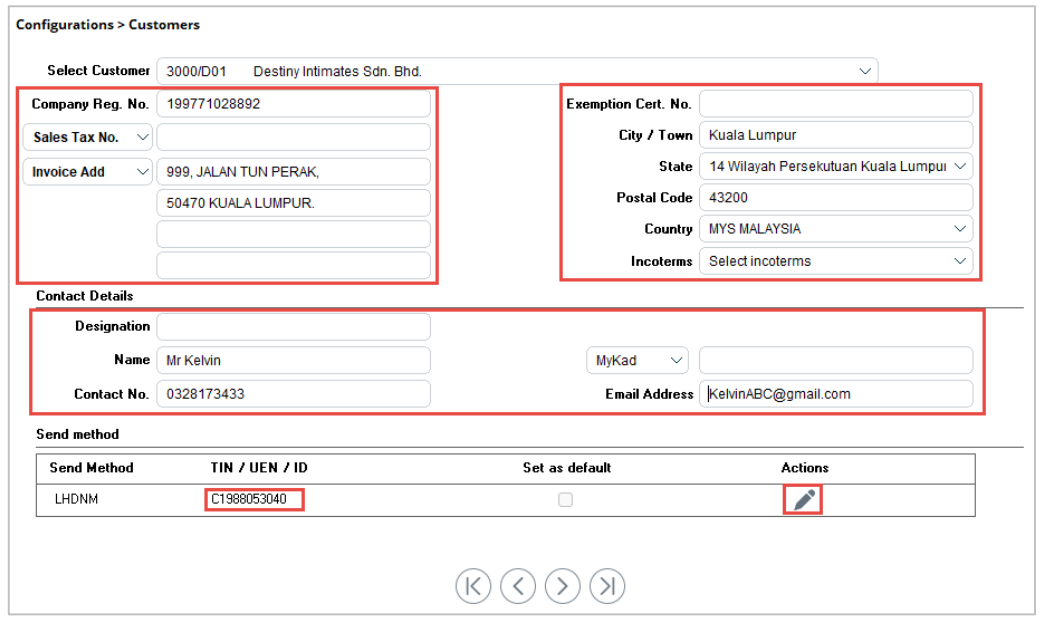
Note: All changes will be immediately updated in the database upon completion.
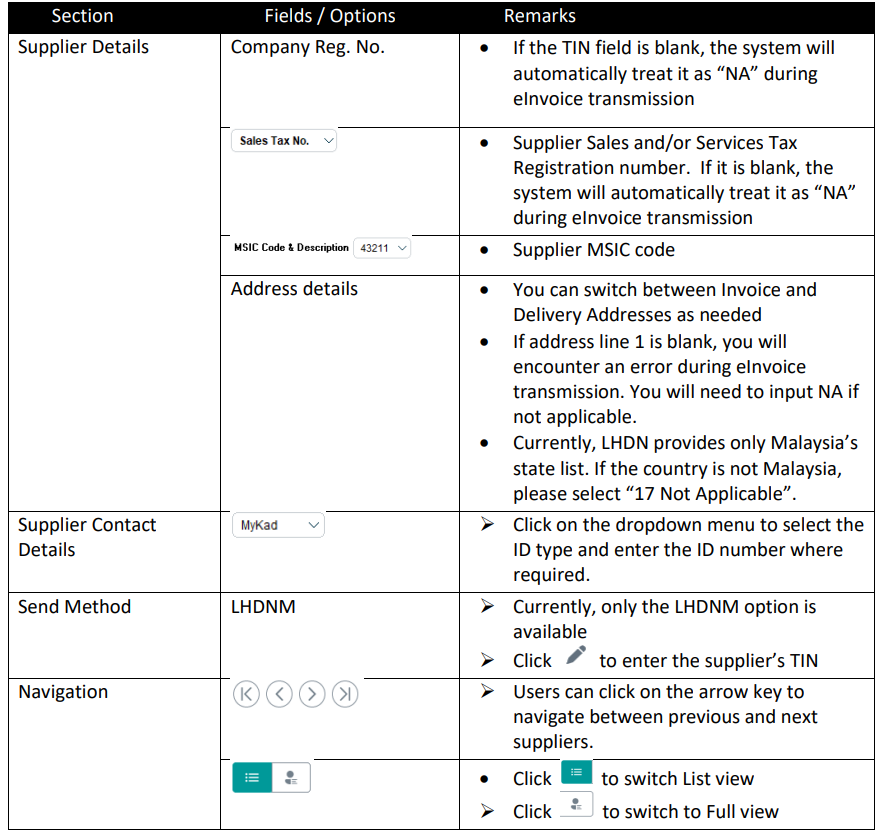
Suppliers #
This screen automatically displays all suppliers stored in your Supplier Masters, offering a convenient overview of any missing information required for eInvoicing
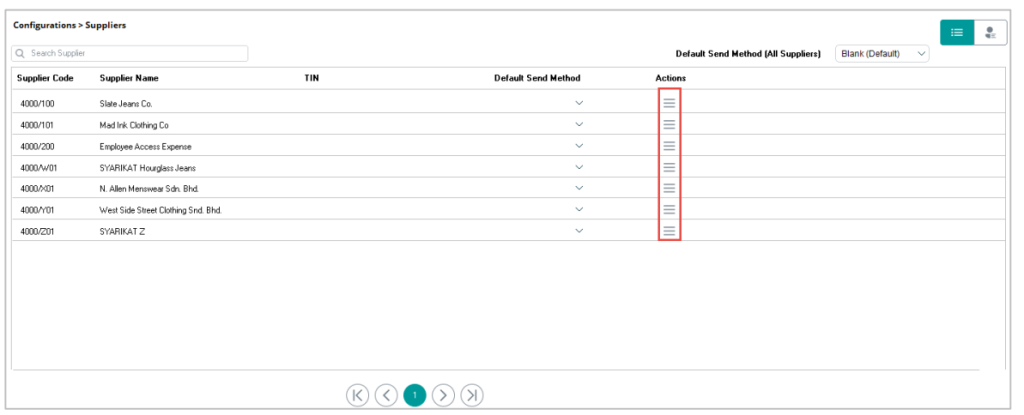
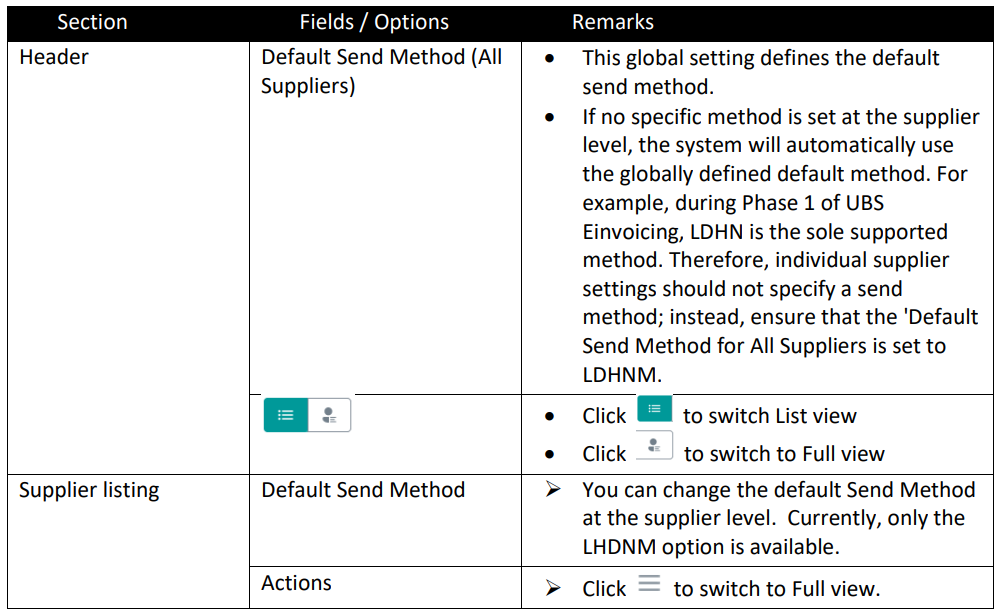
Click on the icon under the Action column to start updating the necessary information for the suppliers. The supplier details will automatically appear on this screen. Please make sure to fill in all the remaining fields, as this information is vital for LHDN validation during the eInvoice process.
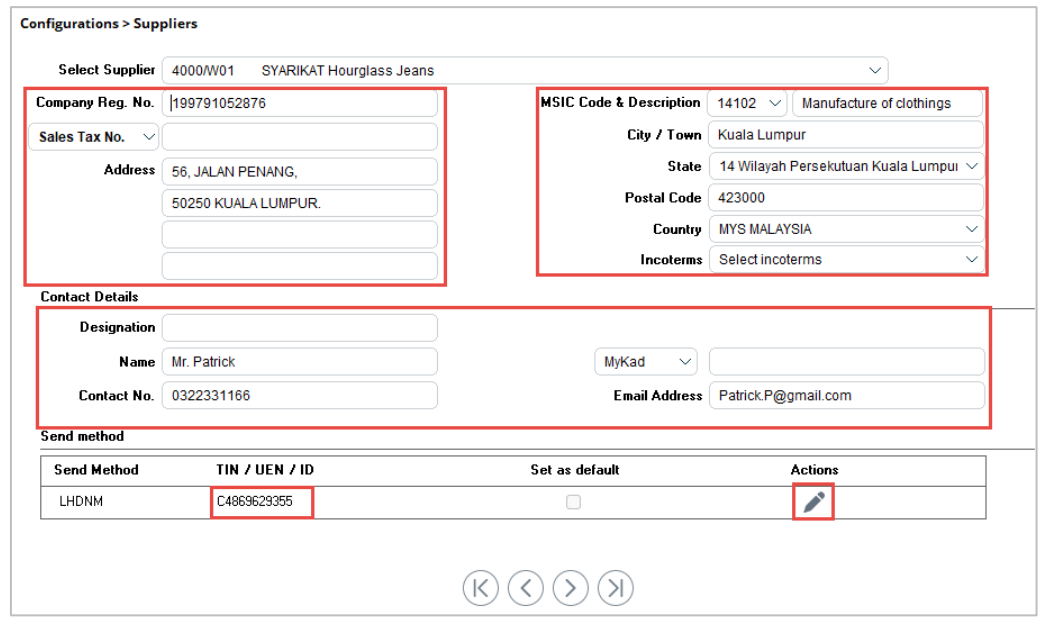
Notes: All changes will be immediately updated in the database upon completion
MISC Code #
MSIC codes are 5-digit numeric codes that denote the nature and activity of a taxpayer’s business. When configuring MSIC codes, you may only select the code maintained in the Company configuration that accurately corresponds to your business.
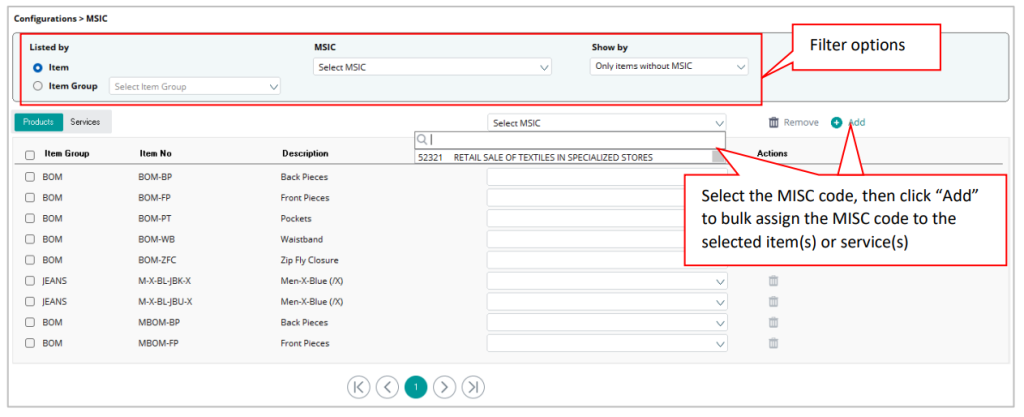
➢ The separation of items and services supports a structured and efficient mapping process,empowering users to navigate and manage their data with ease and accuracy.
➢ Users only need to click on the dropdown list and select the correct value to map to the item.There are 2 options available:
o Option 1: Select the MSIC code from the header dropdown menu, then click on“Add” to bulk assign the MSIC code to the selected item(s) / service(s)
o Option 2: Update the MSIC code directly on the item/service line➢ Additionally, users can optimize their mapping experience by utilizing header options to apply filters.
Note: Selecting “Only items without MSIC” in the “Show by” field will hide any item lines that have already been assigned a value from the classification list. Alternatively, users can select “All” to display the entire item list, regardless of mapping status.
➢ All settings will be automatically saved once changes are made.
Why maintain MSIC at the item level instead of the customer
Sales Transaction – Your business may involve multiple MSIC codes. To help you assign the correct
MSIC code when creating a transaction, the system will automatically select the MSIC code assigned
to the item and include it in the eInvoice transmission.
Note: If there are multiple MSIC codes within the same transaction, the system will consistently select the MSIC code assigned to the first item line in that transaction.
Purchase transaction – The system will select the MSIC code maintained in the Configurations > Supplier
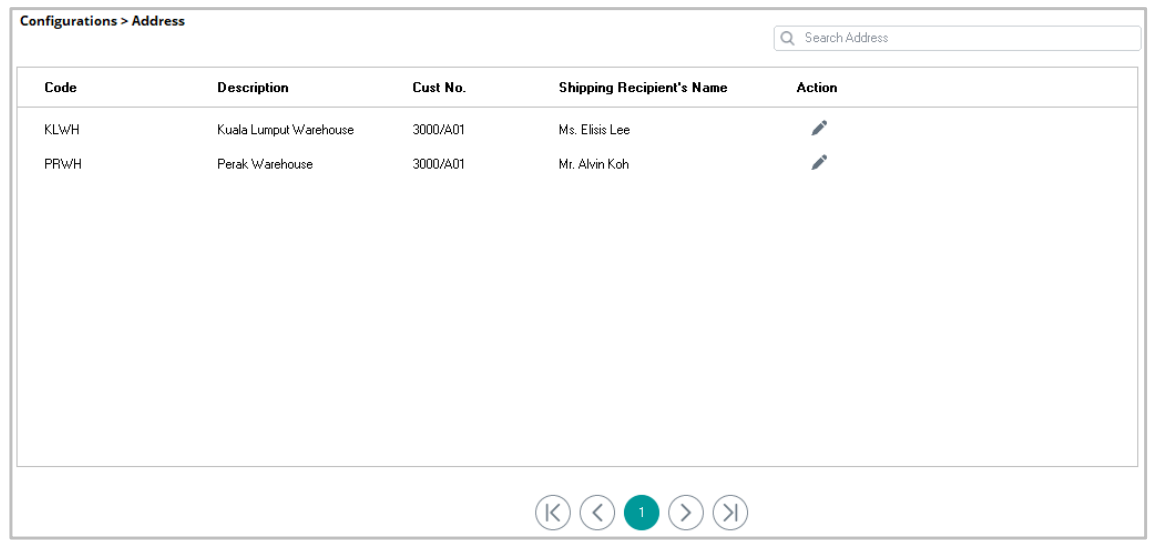
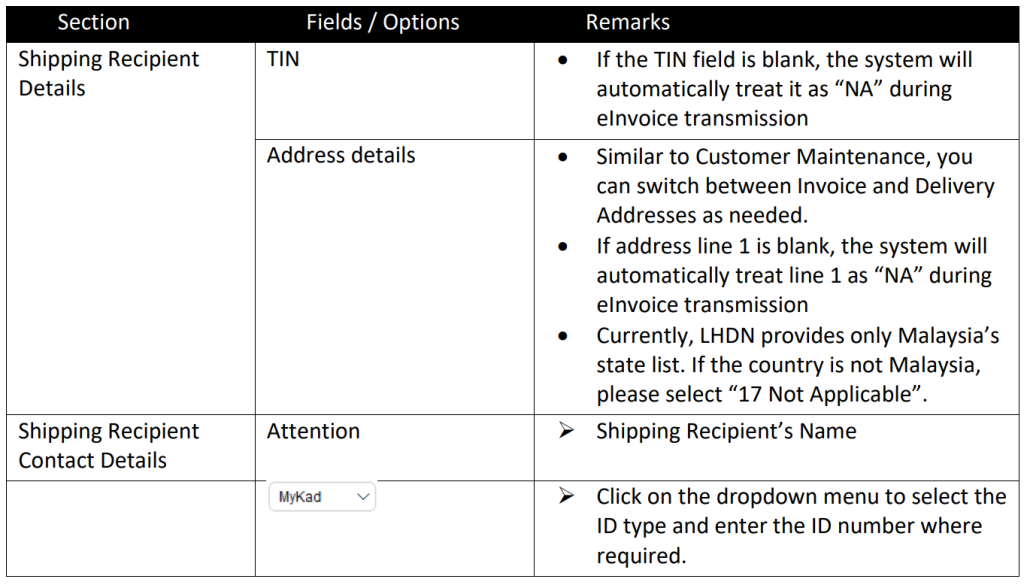
Address Configuration (Shipping Recipient Address) #
Address configuration allows you to maintain additional information required for eInvoice shipping recipients. All addresses stored in your Address Maintenance will automatically appear on this screen.
List View
Click on the action button to edit address information.
Full View
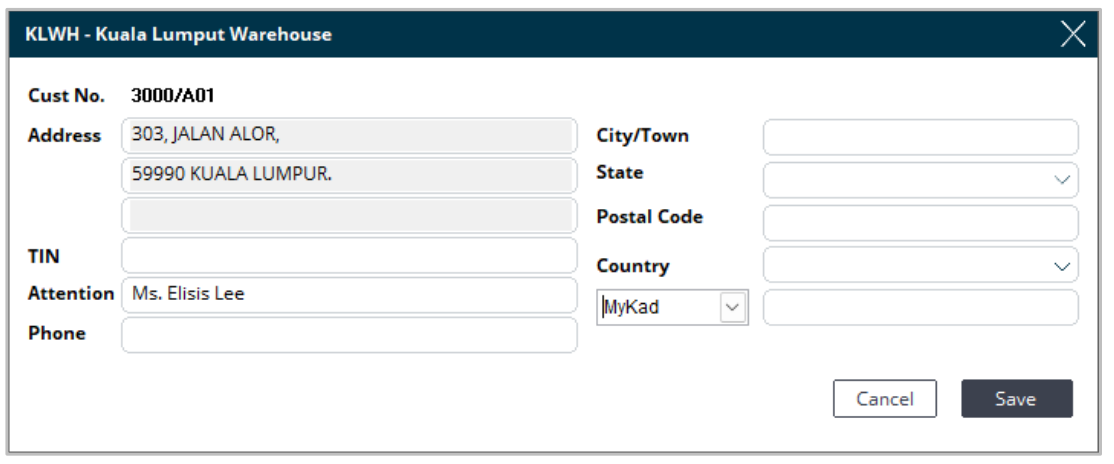
Notes: All changes will be immediately updated in the database upon completion.
Mapping #
Classification #
The classification code list defines the category of products or services billed in commercial transactions. Mandated by LHDN, it is integrated into our solution, allowing users to easily select and apply the required codes to the items stored in the system.
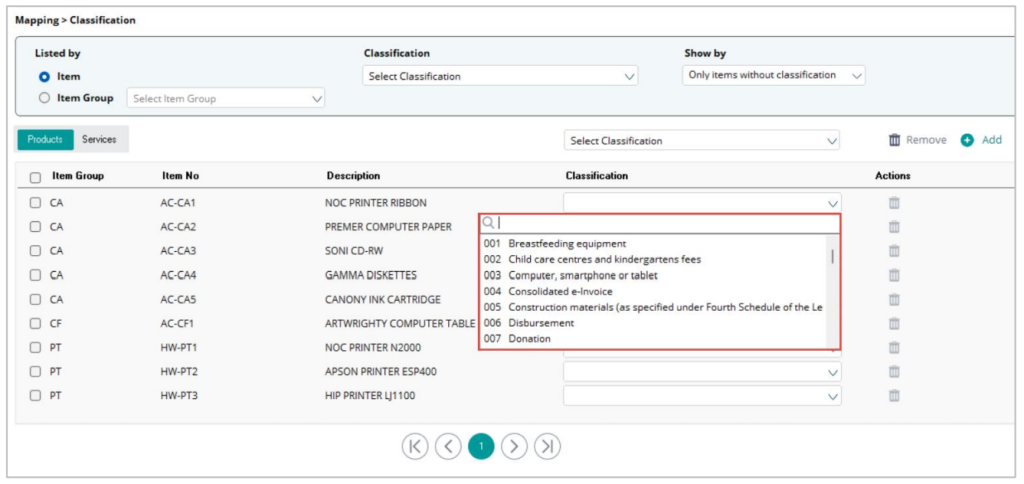
➢ The separation of items and services supports a structured and efficient mapping process, empowering users to navigate and manage their data with ease and accuracy.
➢ Users only need to click on the dropdown list and select the correct value to map to the item. There are 2 options available:
o Option 1: Select Classification from the header dropdown menu, then click on“Add” to bulk assign the Classification to the selected item(s) / service(s)
o Option 2: Update the MSIC code directly on the item/service line
➢ Additionally, users can optimize their mapping experience by utilizing header options to apply filters.
Note: Selecting "Only items without classification" in the "Show by" field will hide any item lines that have already been assigned a value from the classification list. Alternatively, users can select "All" to display the entire item list, regardless of mapping status.
➢ All settings will be automatically saved once changes are made.
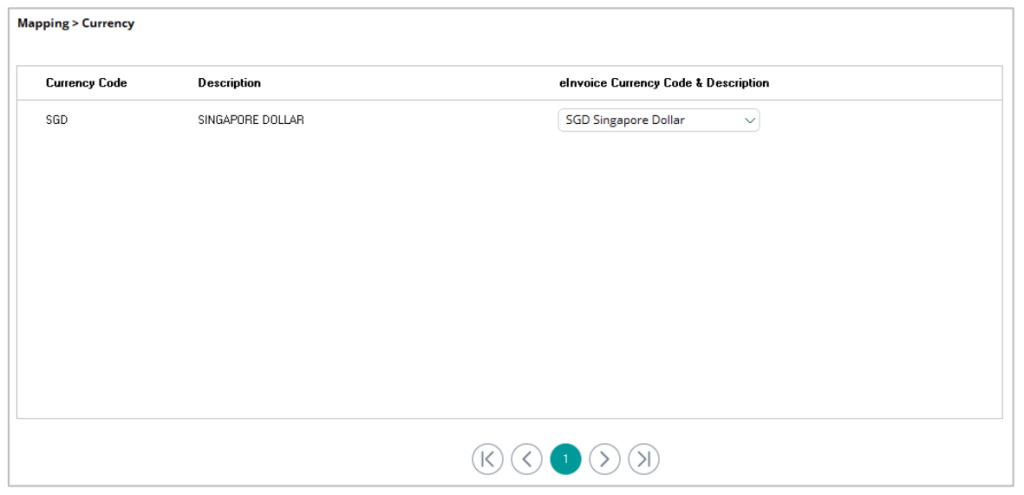
Currency Code #
Currency code mapping enables the system to link your current currency code to the e-invoice code when transmitting to LHDN. To assist you better, only the currencies used within your company will be listed for selection.
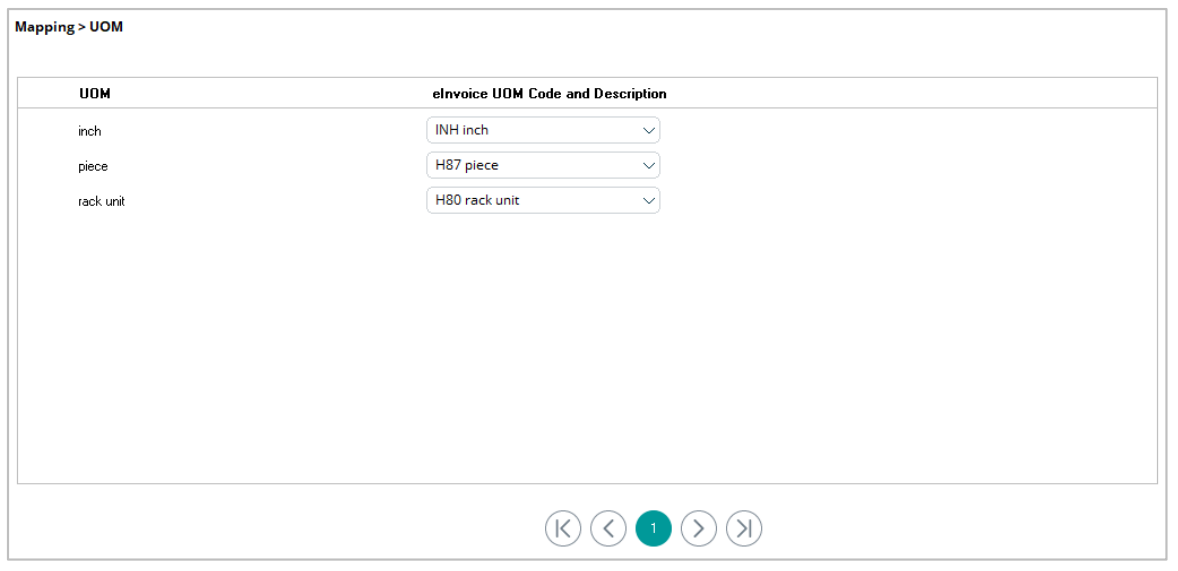
Unit of Measurement (UOM) #
UOM mapping enables the system to link your current UOM to the eInvoice code when transmitting to LHDN. To assist you better, only the UOM used within your company will be listed for selection.
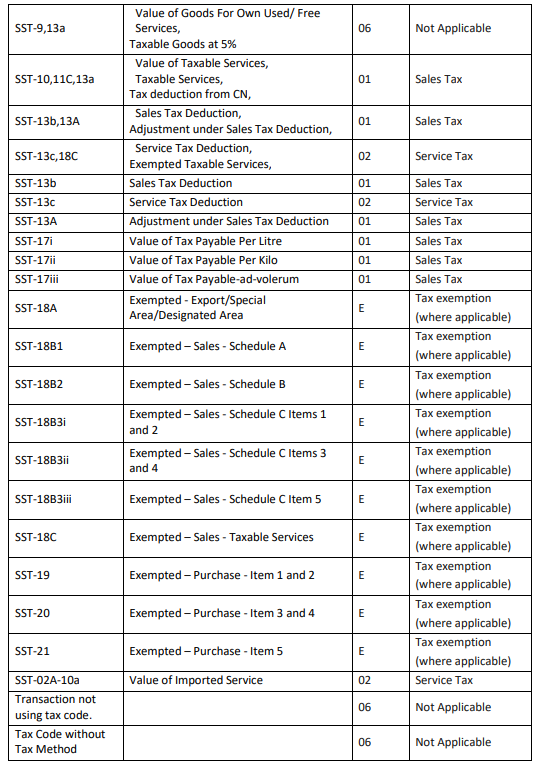
Tax Type #
UBS aligns the SST-02 tax method with the eInvoice Tax Type. This means that the system will automatically link the tax code used in transactions with the correct e-invoice Tax Type when sending e-invoices. If you need more information, you can refer to the following for reference.

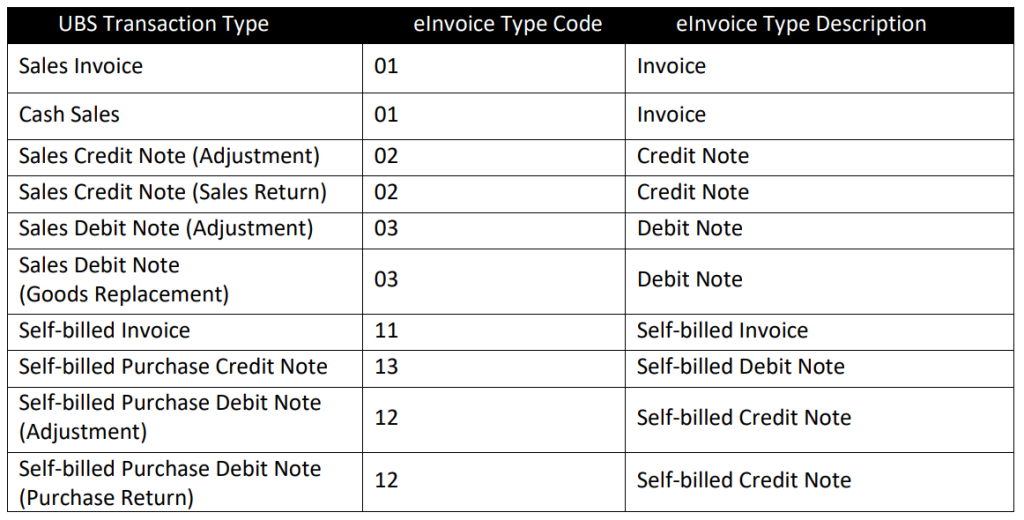
eInvoice Type #
The eInvoice Type mapping will be automatically handled by the system. You may refer to the following for reference.
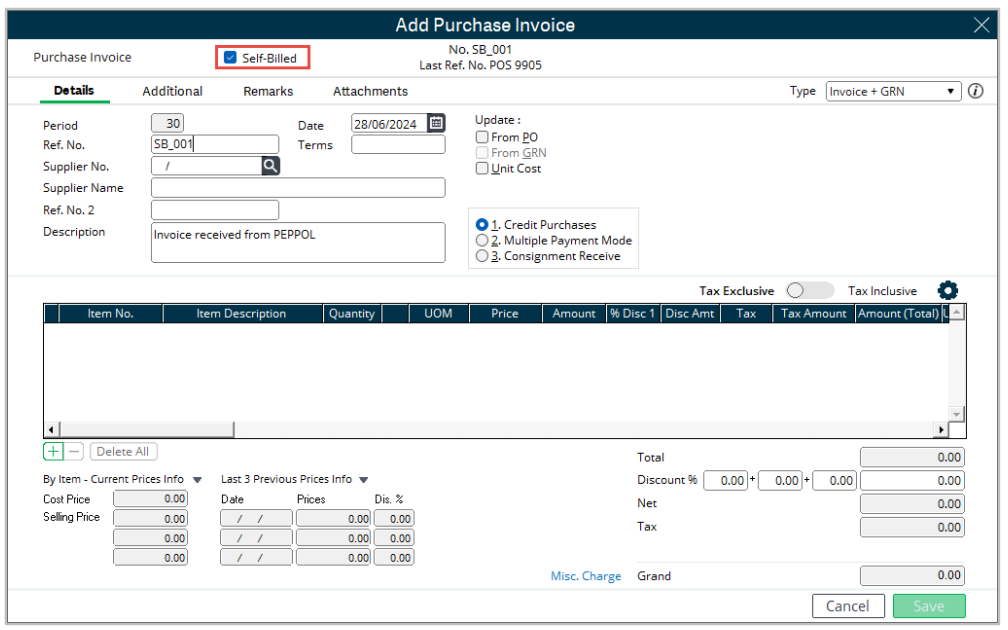
Issuing Self-billed #
A “Self-billed” checkbox has been added to purchase transactions. Please check this checkbox to indicate that it is a Self-Billed Invoice/Credit Note/Debit Note. Self-Billed now shares the running number with the normal Purchase Invoice/Credit Note/Debit Note.
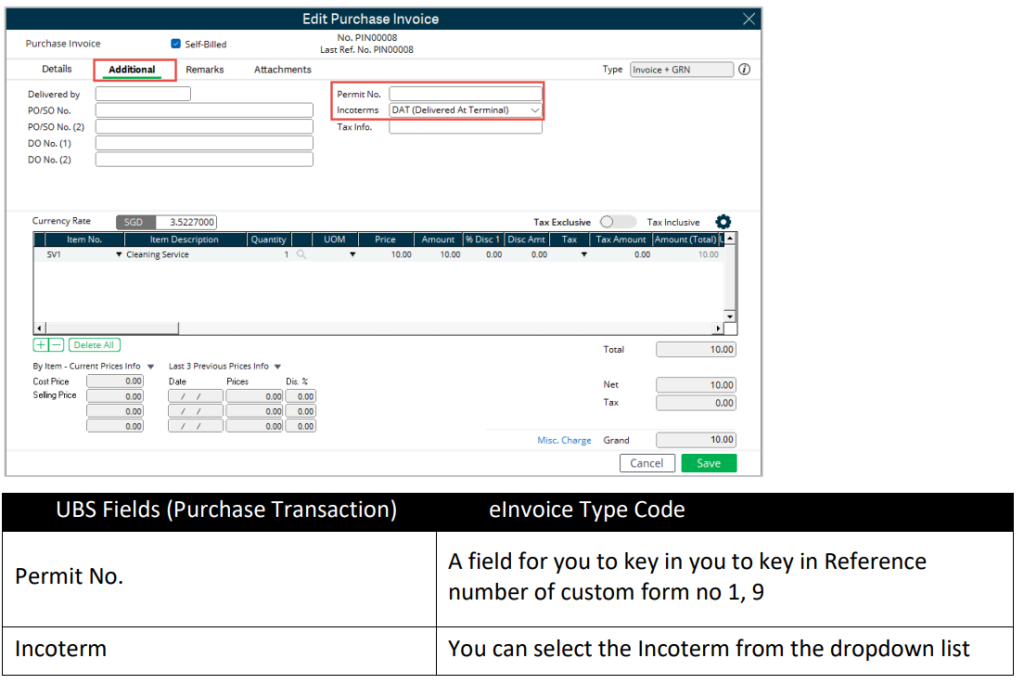
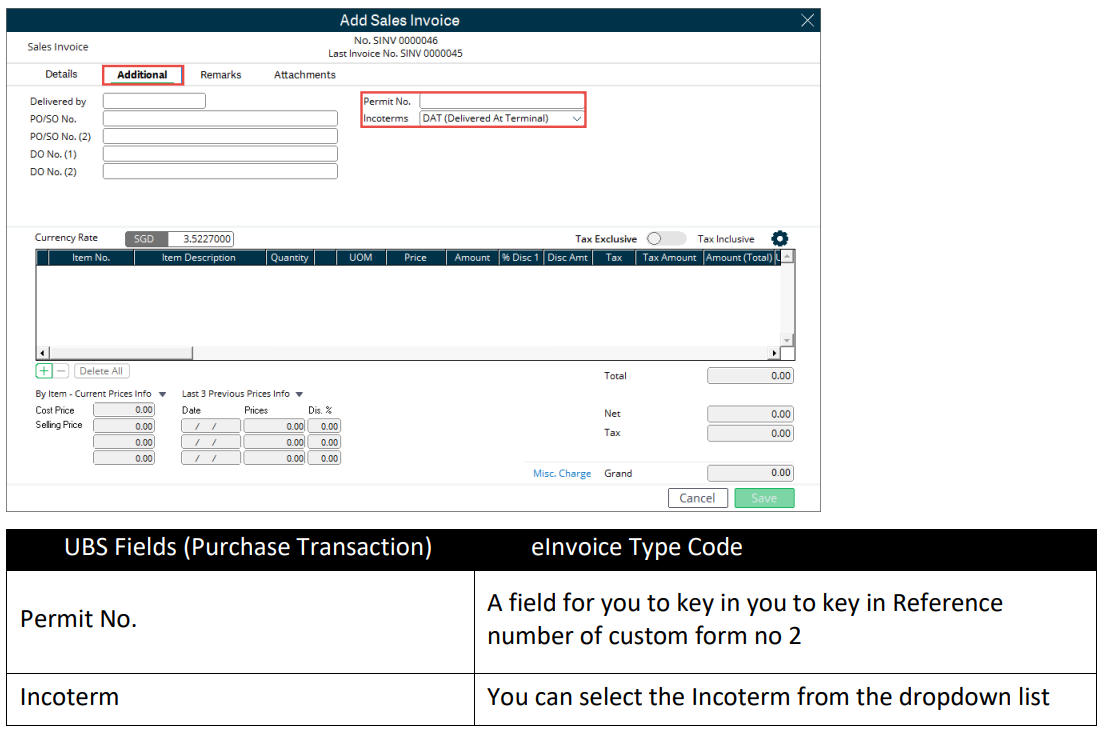
Import and Export Information #
Purchase
Sales
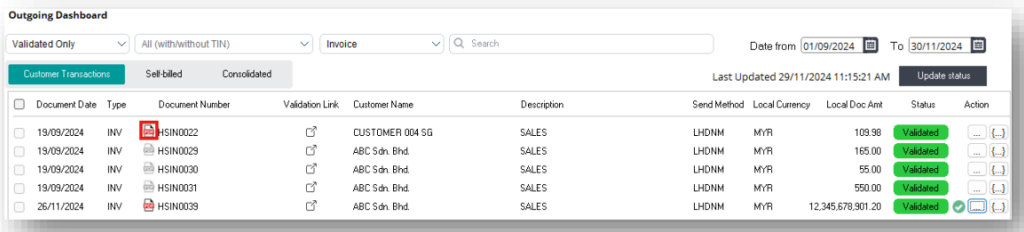
Outgoing Dashboard #
The Outgoing dashboard is the centralized hub managing all invoices generated within the system. Here, you can effortlessly access, review, approve, disapprove, and transmit invoices for validation, streamlining your workflow and ensuring efficient invoice management.
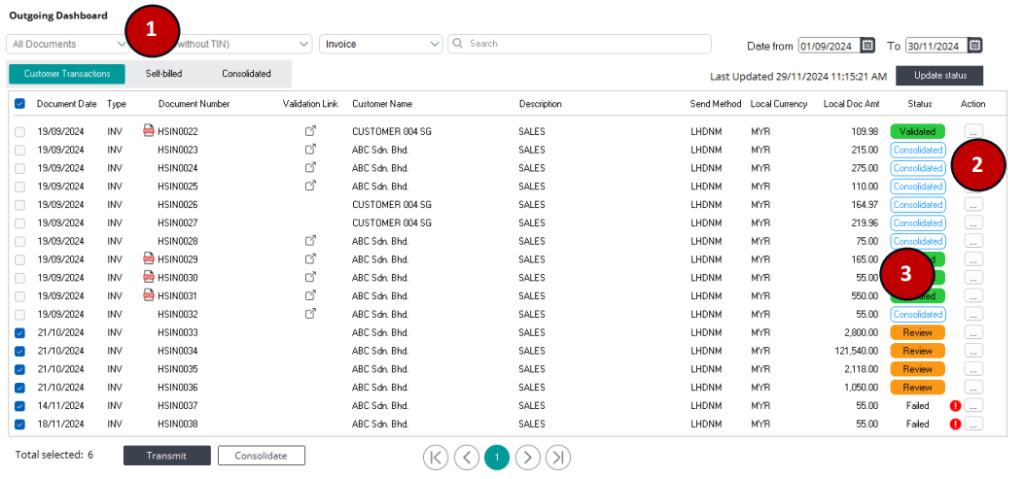
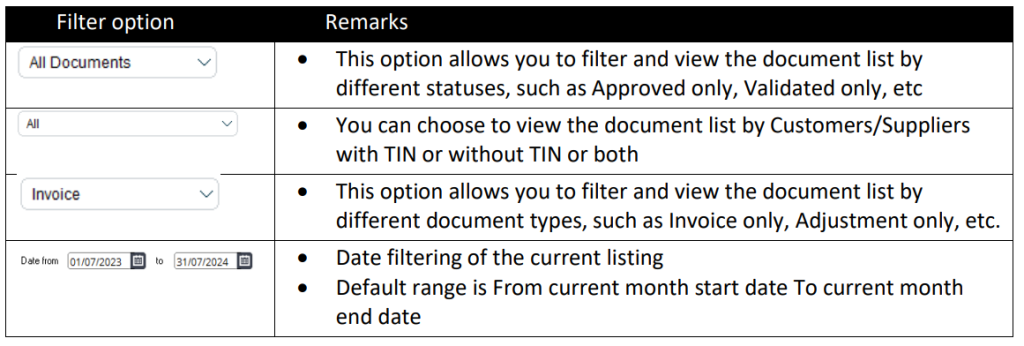
1.Filter options
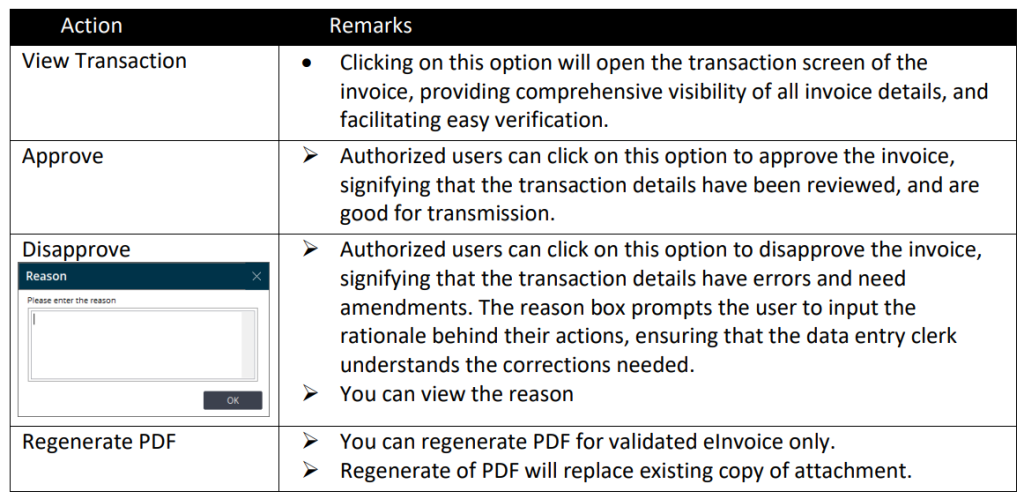
2.Actions
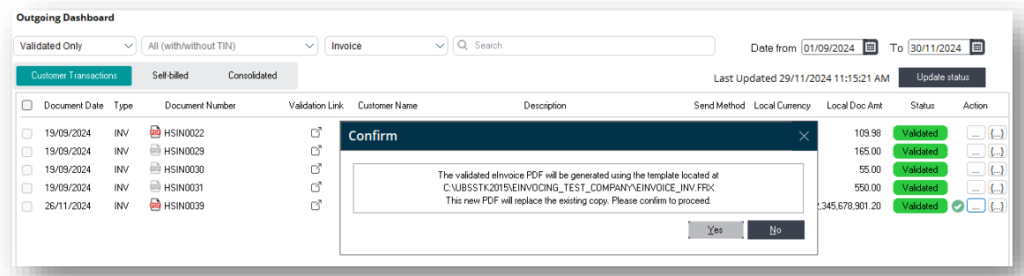
3.Document statuses
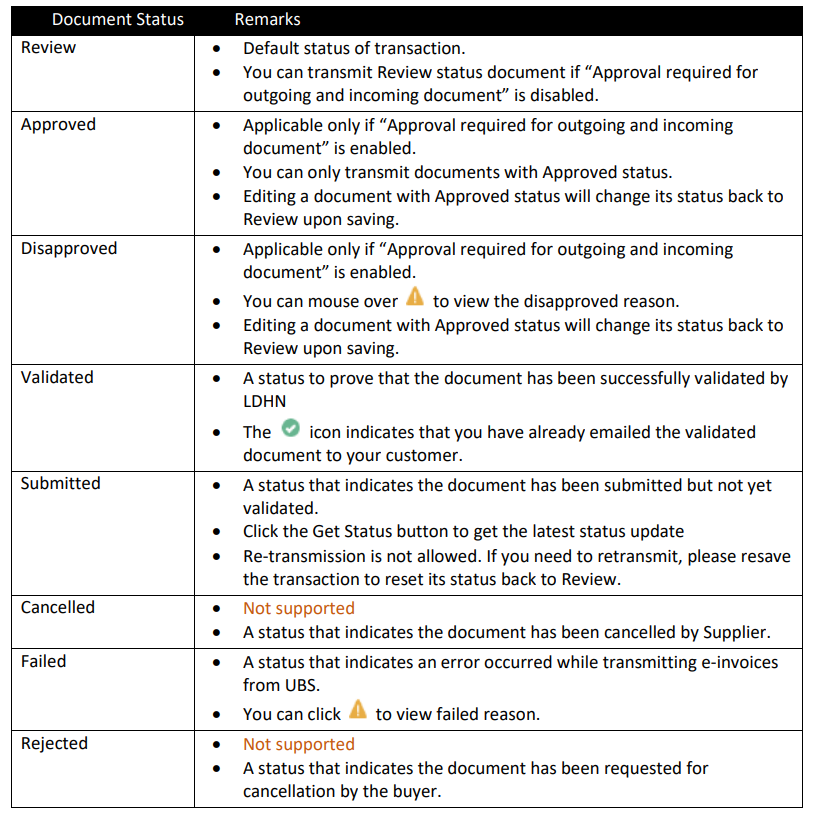
Users have the option to select approved invoices for transmission. Once the transmission is successful, a Unique Identifier is provided for QR code generation. This validated invoice will then be stored in the Document Attachment tab of the invoice transaction screen for easy retrieval.
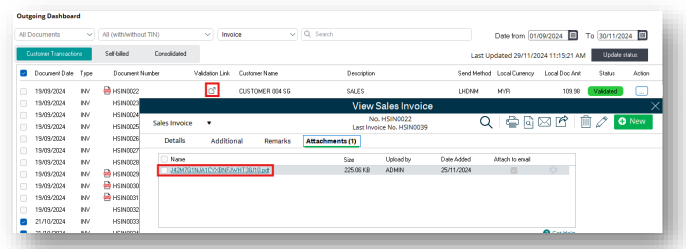
Regenerate PDF for validated einvoice #
You can now regenerate PDFs for validated eInvoices. Please note that this feature is made available only for those validated documents.
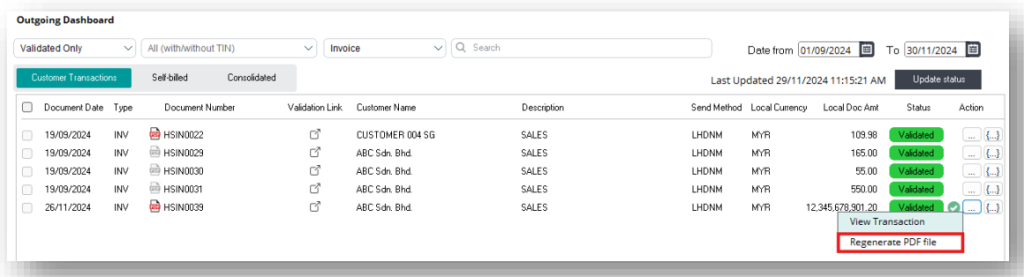
Regenerate PDF will replace the existing copy of eInvoice PDF attachment, you will need to confirm before action is taken.
New shortcut has been added to allow you to quickly access the validated eInvoice PDF. Please note that the PDF icon will be disabled if the attachment is not found.
Consolidated eInvoice #
Issuing of Consolidated eInvoice #
To assist the Suppliers in complying with e-Invoice requirements and to reduce the burden to both Suppliers and Buyers, the LHDN allows the Suppliers to consolidate the transactions with Buyers (who do not require an e-Invoice) into a consolidated e-Invoice every month.
In UBS, the consolidated eInvoice function is available in both the Customer Transactions and Selfbilled tabs. Please be aware that adjustments are not permitted during the consolidation process.
Step:
1. Select the invoices you want to include in the consolidated e-invoice. Please note that if the Approval setting is enabled, you must first approve the transaction before you can select it for the consolidated eInvoice.
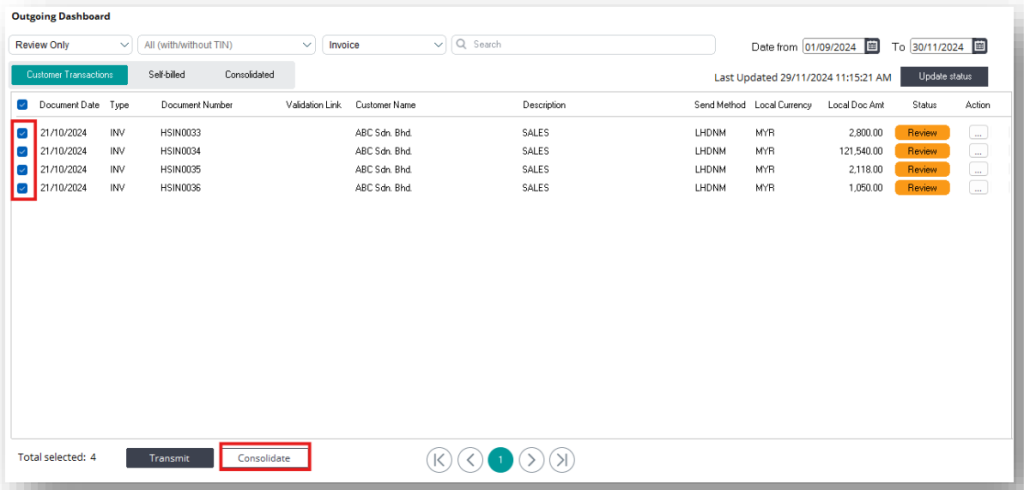
2. Once the documents are included in the Consolidated eInvoice, their status will change from Review/Approved to Consolidated.
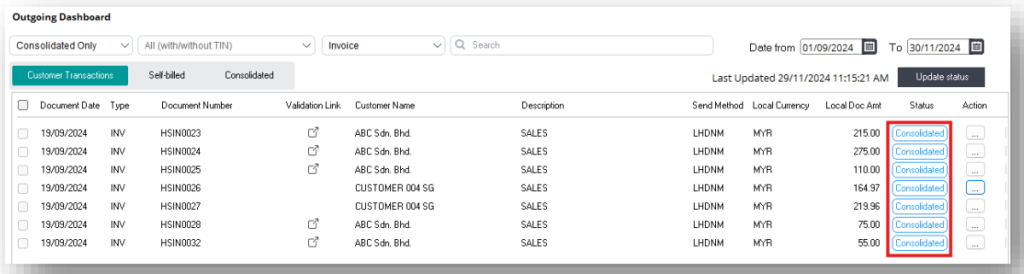
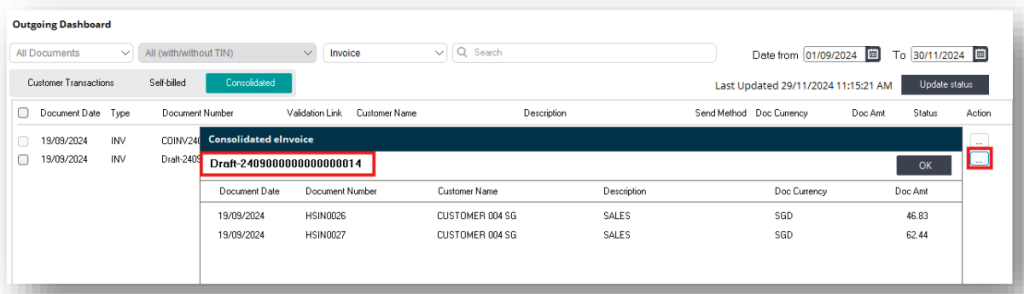
3. Now, navigate to the Consolidated tab, where you will see a new consolidated document with a draft reference created. Do note that If you select documents with different currencies, the system will automatically split them into separate consolidated documents, as only transactions with the same currency can be grouped in a single consolidated document.

4. Before transmitting, you can view the breakdown by clicking the three dots button and selecting “View List.”
5. No approval is required for consolidated documents. Similar to a standard eInvoice, select the document using the checkbox and click on “Transmit.” The system will now generate the actual internal reference number for the consolidated eInvoice.
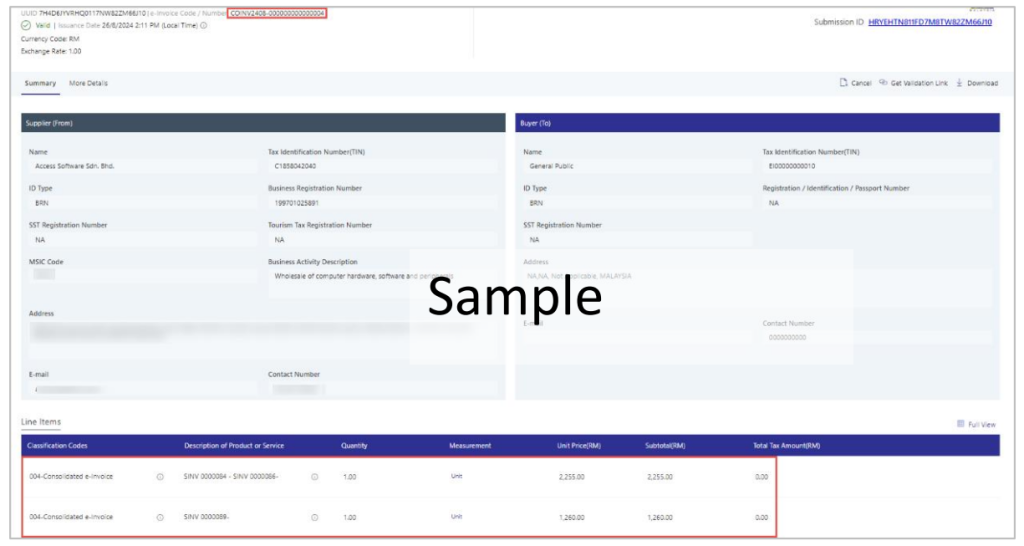
Once the consolidated eInvoice is successfully validated, you can click on the validation link, and the system will redirect you to the MyInvois page to view the summary of the validated eInvoice. The same UUID and validation link will be saved for each transaction within the same Consolidated eInvoice and NO PDF will be created for the consolidated eInvoice.
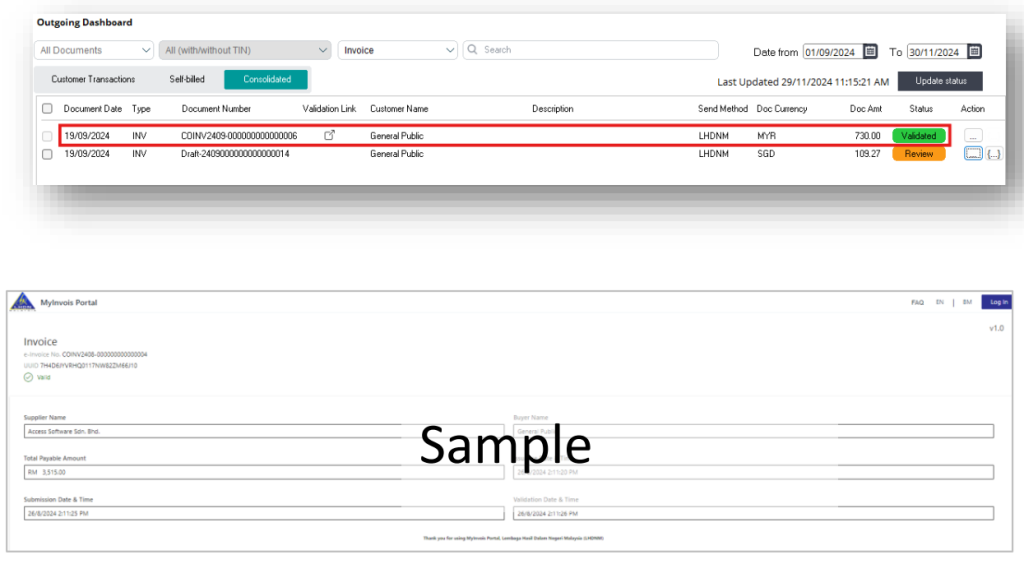
You can log in to MyInvois Portal to view the complete details of the Consolidated eInvoice.
Editing of Consolidated eInvoice #
If you need to edit a transaction that has been included in a consolidated eInvoice, navigate to the Consolidated tab, select the consolidated eInvoice you want to edit, and click on the three dots button, then choose “Remove.”
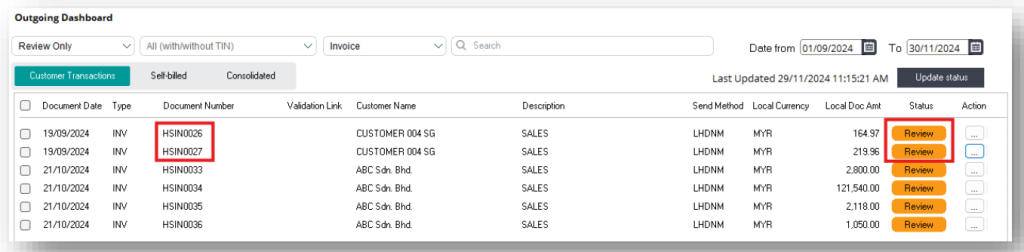
Please note that only consolidated e-invoices with a Review status can be removed.
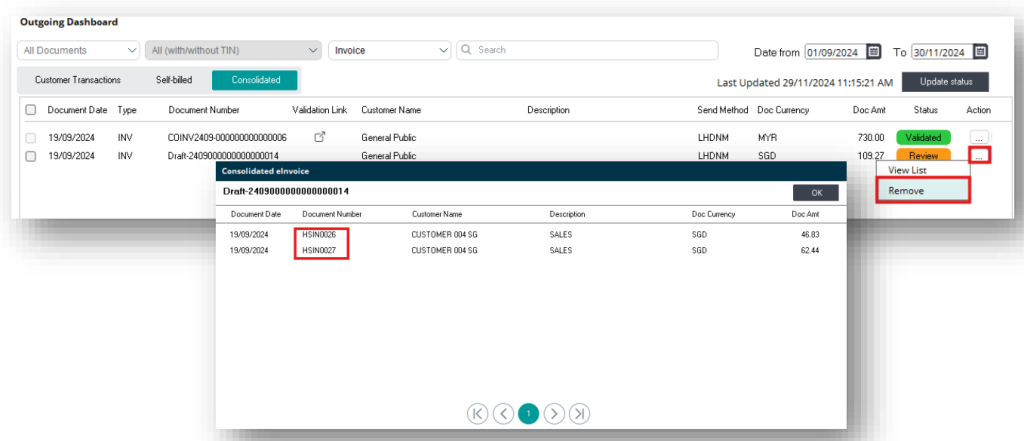
This action will change the status of all transactions within the same consolidated e-invoice group from “Consolidated” back to their original status.
Adjusting a Consolidated eInvoice #
In the adjustment screen (e.g., Credit Note or Debit Note), you can select invoices that were previously grouped under a consolidated eInvoice for adjustment. When transmitting a Credit Note to LHDN, the system will use the reference number and UUID of the Consolidated eInvoice. Please note that only invoices from the same consolidated eInvoice can be selected and transmitted to LHDN at one time.
Note: Adjustment of Cash Sales transactions is currently not supported.
eInvoicing User-Defined Menu #
To restrict access to specific functions to authorized personnel, UBS has been upgraded to enable users to allocate permissions to the relevant menus. Kindly note that User-Defined eInvoicing is exclusively accessible in the Modern View.
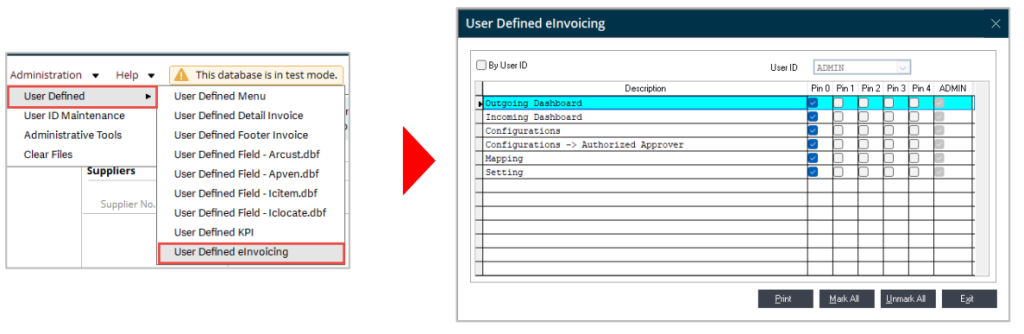
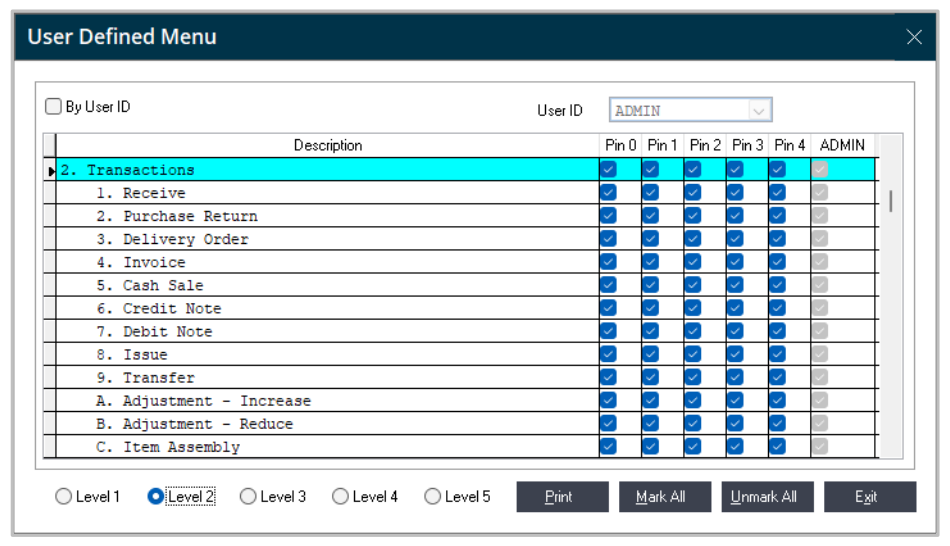
Access for viewing or editing transactions will still be governed by the existing user-defined settings in the User-Defined Menu.
Setting (Available Only in Test Mode) #
Users will be required to input a temporary email address in this section to simulate the receipt of the validated e-invoice.

Customizing source documents to include einvoice QR code #
If you have customized your source documents, please follow the instructions to add the eInvoice QR code to your customized template. Please be aware that the QR code will only be printed after the invoice is validated by LHDN.
Step 1: Please copy a new set of your existing source document template, paste it into the same folder, and rename it to the following:

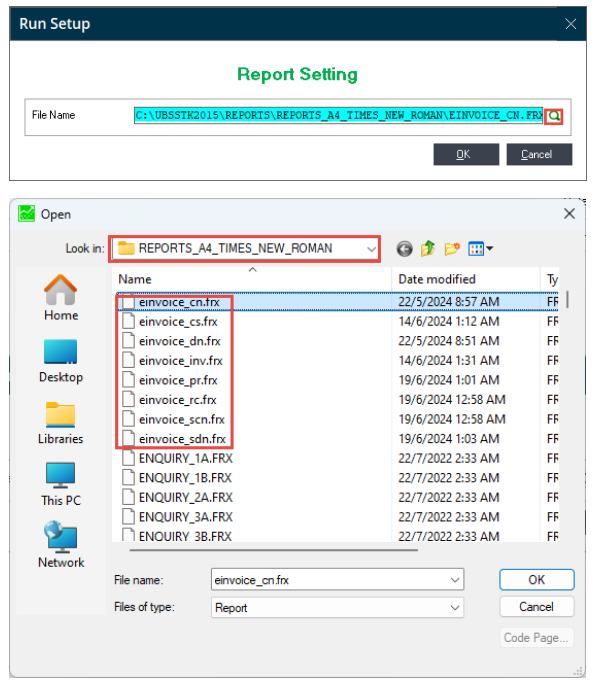
Step 2: Go to UBS…Inventory & Billing or Billing…Modern View…Setup…Report Setting

Step 3: Click on the magnifier glass icon and go to the following folder to open any of the einvoice template (i.e einvoice_cn)
i.e. C:\UBSSTK2015\REPORTS\REPORTS_A4_TIMES_NEW_ROMAN
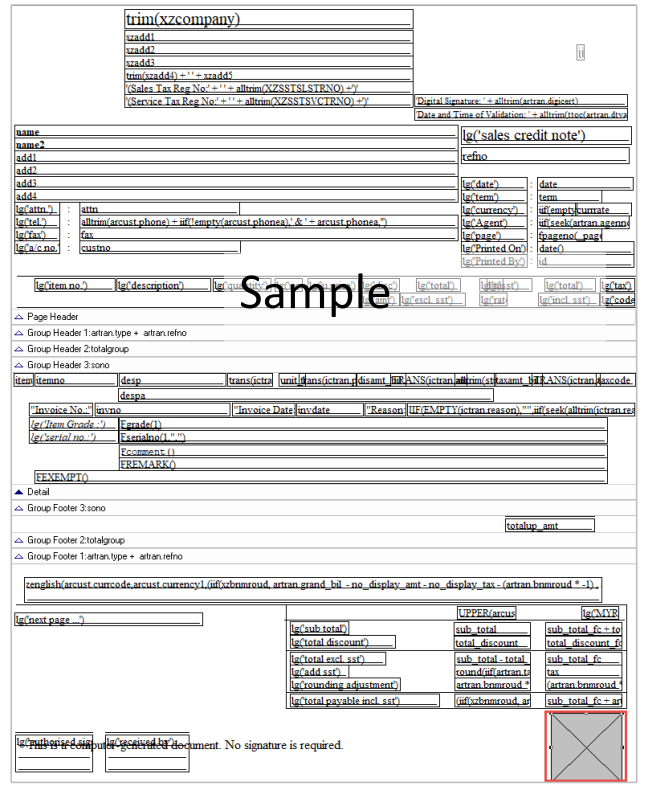
Step 4: Right-click on the grey square box and click on the “Copy” function
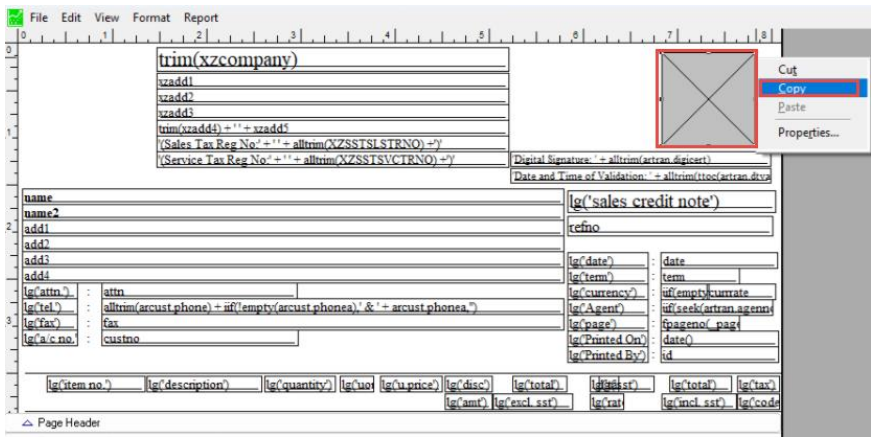
Step 5: Close the screen at step #4. At the Report Setting screen, browse your einvoice customized template.
i.e. C:\UBSSTK2015\CompanyABCPaste the copied item into your e-invoice customized template based on your location preference. Once done, your customized template will be ready for use.
For example:
Credit by: Webstation


