- Setup Guide
- Type of E-Invoice status at Frontend.
- QR Submit
- Direct Submit
- Consolidate Invoice
- Non E-Invoice transaction.
- Void Transaction.
- How to resubmit “Invalid” E-Invoice.
- How to resubmit QR Submission.
- How to do Refund Note.
- How to create E-Invoice Sales Order with deposit. (Retail Only)
- How to refund E-Invoice Sales Order deposit. (Retail Only)
- Send E-Receipt via Email
- E-Invoice Monitor
- Important Notes
- Changelog v3
Setup Guide #
This guide will showcase how can you setup your POS 5.2 Backend to enable the feature of E-Invoice and
guide to how to submit E-Invoice to MyInvois via Frontend.
- Login to your POS 5.2 Backend.
- Navigate to Tools > Options.

3. Go to General > Country & Tax > e-Invoice and then tick “Enable e-Invoice”. Then you can set your Start Date.

4. Next go to General Maintenance > Company Profile.

5. Click on Tax Entity / TIN drop down list and then click on Add New to add a new TIN number.

6. Fill in your own company Tax Entity details accordingly.

7. After that select your TIN you have just created then press OK.

8. Next go to Point Of Sale > Maintenance > Terminal Settings Maintenance > Edit.

9. Then go to Tax > Tick “Enable E-Invoice” and set the Start Date.

10. Press OK and then you can synchronize the settings to frontend.
Type of E-Invoice status at Frontend. #
a) QR Submit – Submit by customer themselves by scanning the QR code printed at the receipt to
fill in the form and submit to MyInvois.
b) Direct Submit – Submit by user by entering customer details into the system and directly submit
to MyInvois.
c) Consolidated Invoice – Transaction that are haven’t submitted to MyInvois yet.
d) Non E-Invoice – Transaction that are dismissed from E-Invoice status will not be able to submit to MyInvois and will be excluded from consolidate E-Invoice.
QR Submit #
1. Enter your item and then proceed to make payment.
2. At payment screen, tick on the “Print QR Submission” to submit via QR Submit and then make payment.

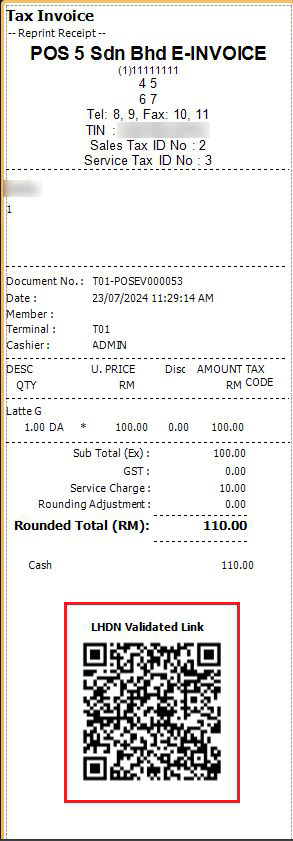
3. Your receipt will generate a QR code for customer to scan.

4. Scan the QR code to redirect to AutoCount AIP server and fill in the TIN form accordingly. You may have to verify your email address for our AIP server if you are submitting for the first time using AutoCount.

5. After submission, wait for MyInvois to validate the transaction. If the transaction is valid, our system will email customer a copy of E-Receipt along with QR code changed to MyInvois validated link. Scan the QR on that link and you will be redirected to MyInvois validated transaction portal.

6. In our system, user can check for the transaction status at Find Transaction screen by right clicking the header and choose “Column Chooser”.

7. Double click or pull out “E-Invoice Status” and “E-Invoice Validation Link”. You can drag out more info regarding E-Invoice for reference purpose.

8. You will notice the status is “Valid” and user can click on the “…” at E-Invoice Validation Link to redirect to MyInvois Portal for this validated transaction.

9. You will be redirect to the same document link as the QR Code printed for customer.

Direct Submit #
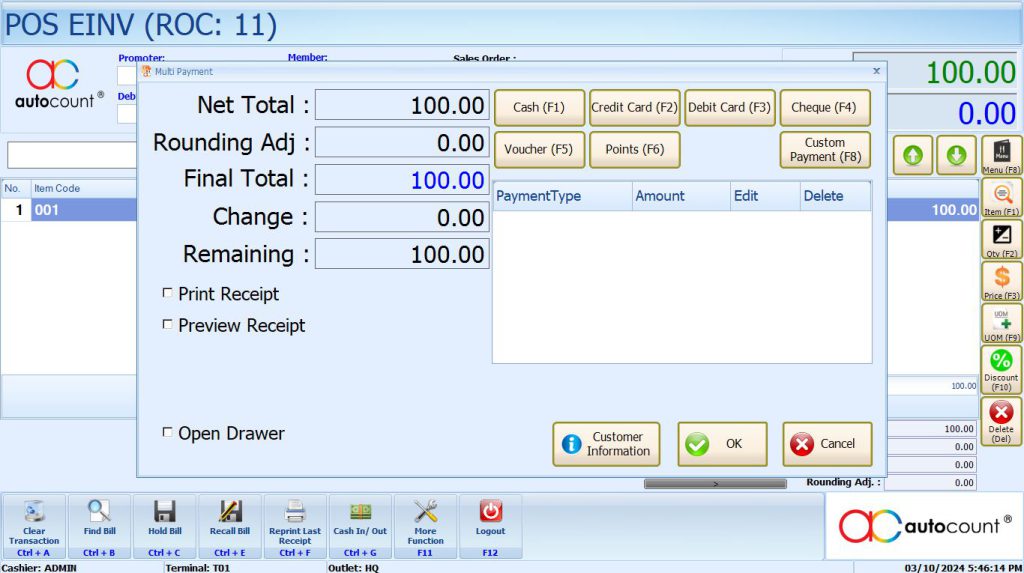
1. Enter your item and then proceed to make payment
2. At payment screen, click on “Customer Information”.

3. Fill in the TIN information and tick on “Submit E-Invoice” then click OK and proceed with your payment.

4. After system validate from MyInvois, your receipt will print out with QR Code containing validated link for MyInvois transaction.

5. Scan on the QR Code and it will redirect you to MyInvois portal.

6. Additionally, you can check the status of the E-Invoice at our Find Transaction screen whether the transaction is “Valid” or not. You can click on the MyInvois validated link too.

7. Click on the validated link will redirect you to MyInvois Portal.

Consolidate Invoice #
1. Enter your item and then proceed to make payment.
2. Do not tick “QR Submission” nor “Submit E-Invoice?” in customer information in this case.
3.Next go to backend > e-Invoice > Consolidate e-Invoice.

4. Click “New” then tick on “POS” and generate.

5. System will generate an e-Invoice from transaction which are in consolidate state.

6. You can check the details of the e-Invoice by double clicking on it.

7. After that click on “Save” and then wait for the system to validate with MyInvois.

8. You have successfully submitted consolidate e-Invoice.
9. Transaction that had generated consolidate will no longer be able to void nor submit again.

Non E-Invoice transaction. #
- Under special circumstances, if this transaction does not need to create as E-Invoice, user can
disable this transaction as E-Invoice.
2.To do so go to More Function > Submit E-Invoice?.

3. Untick Submit E-Invoice?

4. This transaction will no longer be able to submit to MyInvois and will be excluded from consolidate
e-Invoices.
Void Transaction. #
1. To void transaction, go to Find Transaction screen, then search for the Document you want to void
and then click on the “Void” button.

2. Press “OK” to confirm voiding this transaction.

3. Then enter your reason for voiding this transaction.

4. Press “OK” if you want to print the voided receipt. A QR code with the MyInvois validated link will be
included too.

5. The status will then changed to “Cancelled”.

6. You can double check the transaction status by clicking on E-Invoice Validation Link “…” button.

7. It will show “Cancelled” status on MyInvois portal.

How to resubmit “Invalid” E-Invoice. #
Here are few possible reasons that your E-Invoice will be Invalid when submitted.
1. Wrong TIN number.
2. Invalid NRIC, MYPR, MYKAS, ARMY (MYTENTERA) number.
3. Date time mismatch with MyInvois.
You can amend these details to resubmit when “Invalid” status is returned from MyInvois.
1. To do so, go to your Find Transaction and look for the “Invalid” transaction.

2. You can view your “Invalid” return message from MyInvois at the “…” from E-Invoice Error
column.

3. Click on “Submit eInvoice” button.

4. Then edit your wrongly entered TIN info and then click on “OK” button to resubmit.

5. System will prompt message when resubmission succeeded.

6. Finally click on the refresh status to get the latest status from MyInvois. The status should be changed to “Valid” if the details is correctly amended.

How to resubmit QR Submission. #
If user forget to tick the QR Submission during transaction, you can resubmit QR Submission via reprint receipt at Find Transaction.
1. At Find Transaction, click on “Reprint Receipt”.
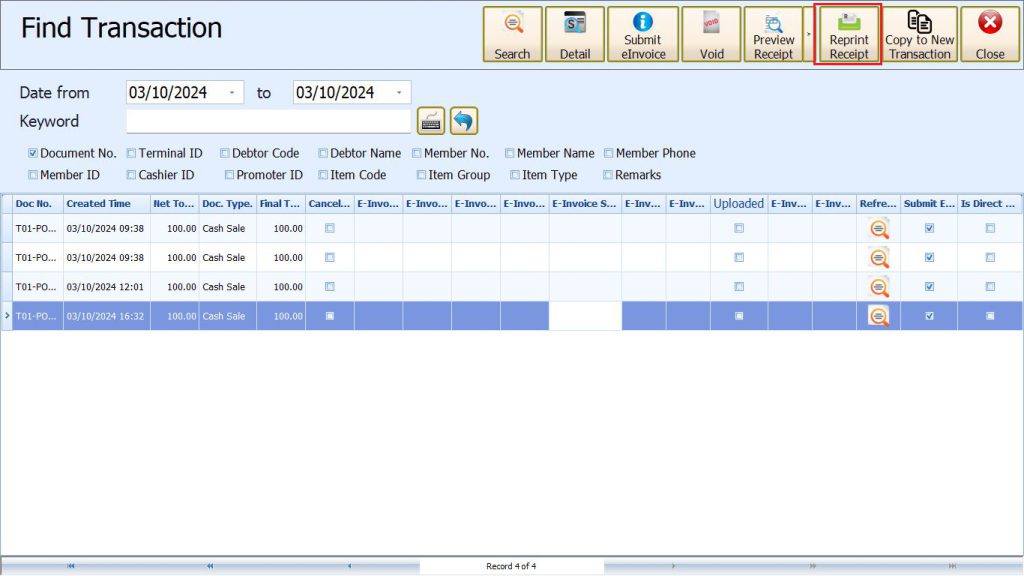
2. System will prompt to ask do you want to print QR Submission.
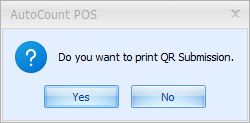
3. Click “YES” and system will reprint the receipt with QR Code.
How to do Refund Note. #
1. To refund, scan the item that the customer previously bought and then enter quantity -1.
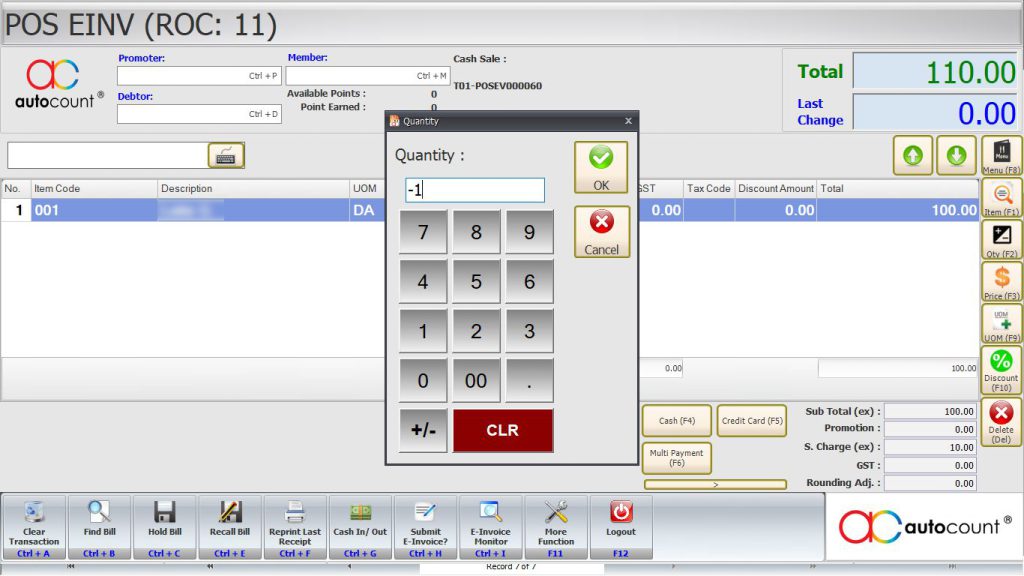
2. Click on “Return” and then key in your previous Cash Sales Document number or search for it.
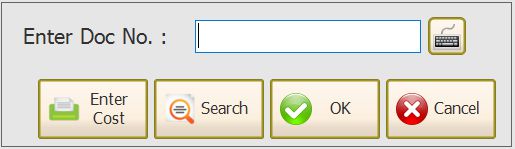
3. Choose your submission method, QR Submit or Direct Submit. For this case I use Direct Submit.
4. After filled in the Customer Information form, choose your refund method.
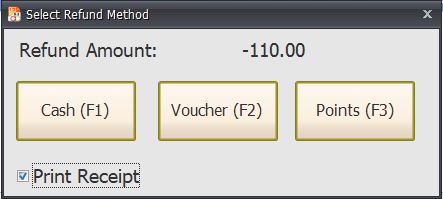
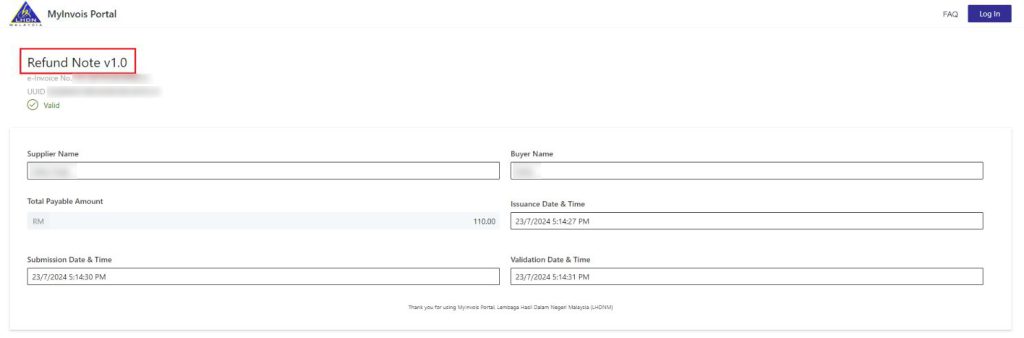
5. Then scan on the QR code on your refund receipt. MyInvois will show this is a Refund Note.
How to create E-Invoice Sales Order with deposit. (Retail Only) #
E-Invoice are required for submission with deposit payment. With current version POS 5.2 Rev9, we have
finally finalized and include Sales Order to support E-Invoice deposit payment.
1. First, create a SO and during payment, do not input any payment and just click “OK”.
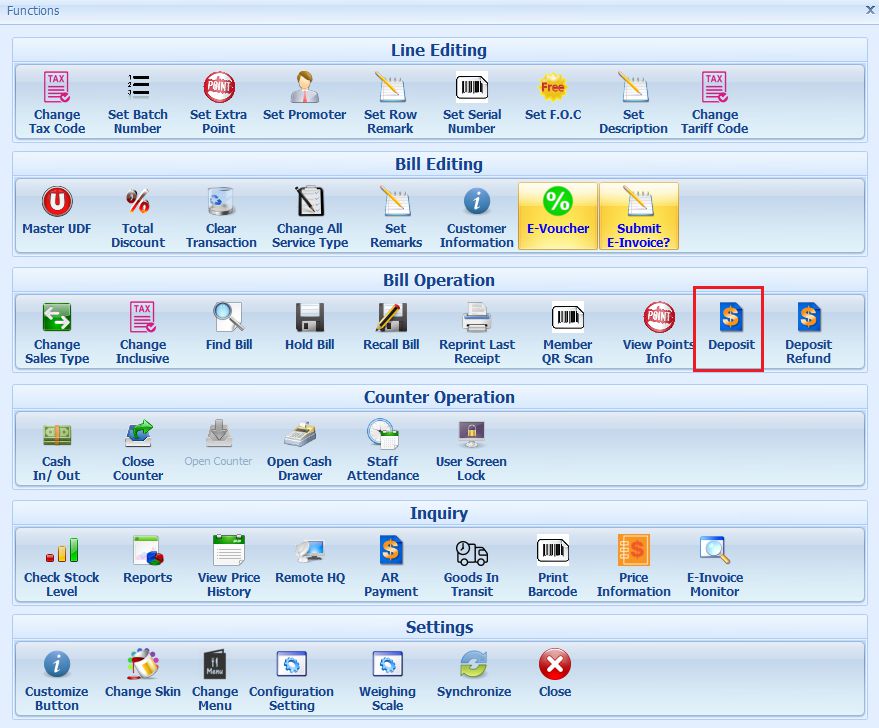
2.Next, to make deposit payment, go to Cash Sales > More Function > Deposit.
3. Then search for your Sales Order and Press “OK”.
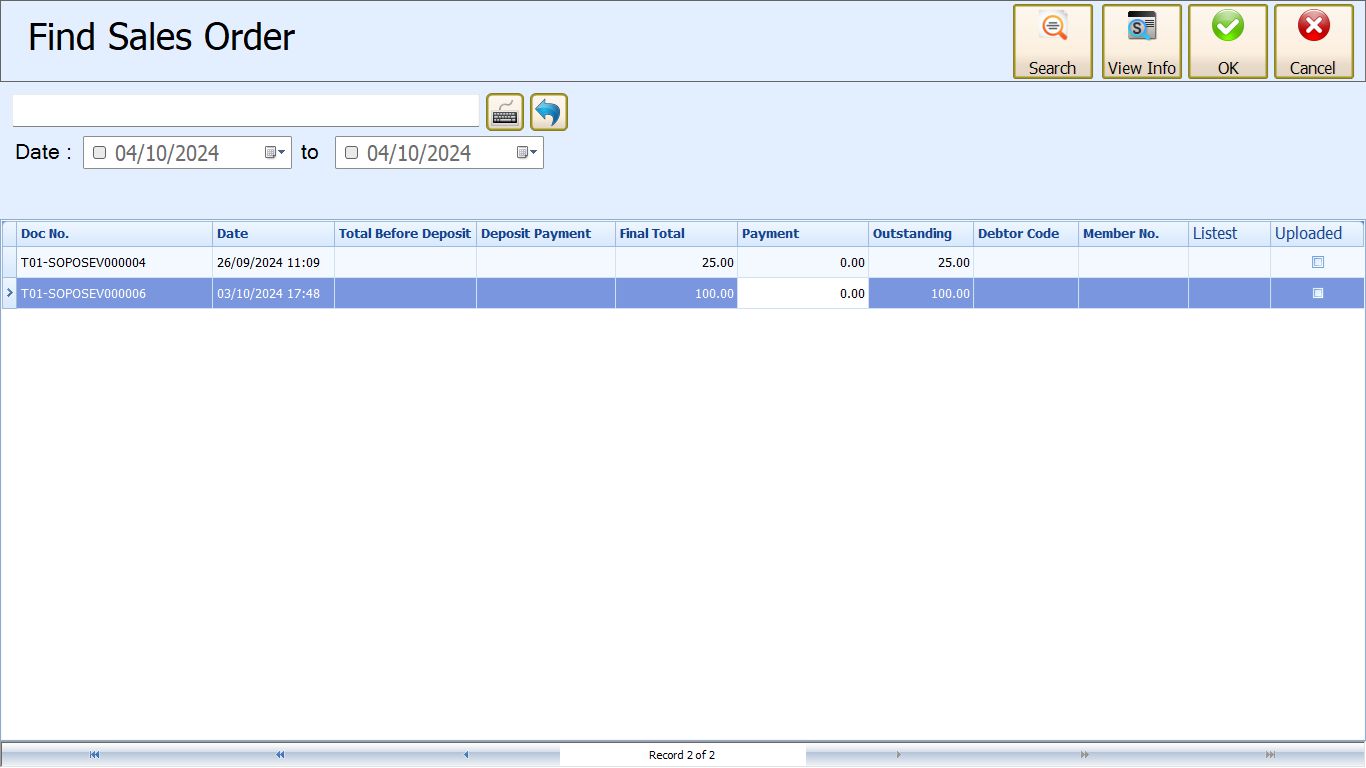
4. You will see system will generate a deposit payment description base on your SO. Enter your deposit amount.
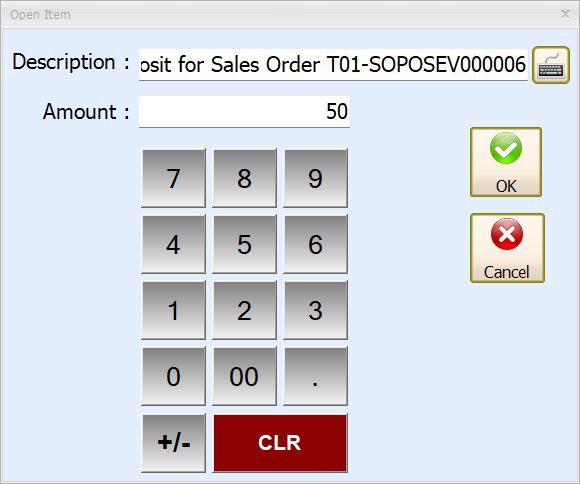
5. System will create an “Open Item” as deposit payment. Then, fill in “Customer Information”, tick submit E-Invoice and make payment.

6. You have successfully submitted deposit payments for E-Invoice.

7. Recall your SO. Deposit payments will automatically inserted in to the next line.

8. To complete this SO, either you can repeat step 1 to 5 or finalize your payment in this SO screen.

9. Then fill in your “Customer Information” for this SO and then tick submit E-Invoice.
10. Your SO had successfully submitted to MyInvois.

**More Info
1. If you make deposit payment directly from SO without generating payment with “Deposit” module, system will not submit E-Invoice for deposit payment. After completed this SO, the deposit payment date you made previously will be counted as today completed date.Eg. Deposit RM50 made on 1st October without using “Deposit”, completed payment RM50 on 3rd of October. E-Invoice will be issued on 3rd of October which totalled RM100.
2. If deposit payment does not exceed 72 hour and haven’t complete yet, transaction can be void.

How to refund E-Invoice Sales Order deposit. (Retail Only) #
1. To refund deposit, click on More Function > Deposit Refund. .

2. Click on “Search” and then highlight the deposit transaction you wish to refund then press “OK”.

3. System will recall this transaction and then click on make payment to choose the refund payment method. Tick on “Submit E-Invoice?”.
4. After that fill in the “Customer Information” form and click OK.

5. You have successfully generated a “Refund Note”.

6. Your SO will automatically remove the deposit payment line.

**More Info
1. Deposit refund transaction can’t be void.
Important Notes for Sales Order E-Invoice.
1. If itemcode had ticked “Must Generate E-Invoice” option, SO mode will bypass this option. In short, SO will not be forced to Direct Submit.
2. SO E-Invoice submission date will be your completed payment date. (When outstanding hits 0.00)
3. SO are not editable after completed payment.
4. SO are default filtered by Debtor/Member. Eg. If your SO got debtor/member inserted, you must insert debtor/member first before choosing “Deposit” or “Deposit Refund” else you will not be able to search for the specific SO document number.
Send E-Receipt via Email #
To set your email setting, login POS 5.2 Backend then go to Point Of Sales > Maintenance > Terminal Settings Maintenance > Tax.

Hotmail:
SMTP Server: smtp-mail.outlook.com
Port: 587 (with TLS/SSL) or 25 (without TLS/SSL)
Gmail:
SMTP Server: smtp.gmail.com
Port: 587 (with TLS) or 465 (with SSL)
Tick on “Required Authentication” and “Enable SSL”.
User Name: Your login user ID for your email (usually is the email address).
Password: Your password for your email address.
From Email Address: The email address for outgoing mail.
For gmail, there is a special password that must generate from google mail to use as SMTP password instead of your gmail password.
First login to your Gmail and then click on top right icon and choose “Manage Your Google Account”.

Then search for “app password” on the top search bar.


Next type in the description for this password and click on “Create”.

Copy the password and fill in the password in POS E-Invoice SMTP settings.

Your automated E-Receipt mailing should be functioning, and customer will be able to receive the E-Receipt
from user.

E-Invoice Monitor #
This feature is for user to check their submission statistic. To access this feature, go to More Function > E-Invoice Monitor.

User can check and view the submission status for this month only as E-Invoice cutoff date is last day of the month.

User can click on “Show” to show the list of failed submission transaction and their error message.

Important Notes #
1. Trade-in will not be accountable for E-Invoice therefore trade in will not be able to submit E-Invoice.
System will force E-Invoice status on trade-in transaction to be false.
2. If there is an item with “Must generate E-Invoice” setting from stock maintenance enabled, system
will enforce current transaction to Direct Submit.
3. If system is in grace period, “Must generate E-Invoice” will not enforce.
4. F&B split bill will not be able to utilize Direct Submit, only support QR Submit.
Changelog v3 #
1. Added how to resubmit QR Submission.
2. Added Sales Order for E-Invoicing.
Credit By: Webstation


