Email Template Setting Sample #
The Overall Outcome of the email will be like :

A. Report Outcome
B. External Link
C. Main item Detail.
Email Template Setting #
How to set email template.
- You need to go to Freely Document Approval > Email Template Setting.

2. Then this prompt out.

- Key in Username and password
- For using Gmail as the sender’s email, you have to go to your Gmail account and create app password (https://support.google.com/accounts/answer/185833?hl=en).

- After created app password, gmail will generate a 16-digit passcode. Please use that passcode in the password column as your password.
- For the Outgoing server and Port, need to set up Gmail outgoing server
> Outgoing server:
smtp.gmail.com (depend on which mail type you are using etc. yahoo.com, Hotmail.com)
port: 465 or 587 (normally will be using 587)
- Tick Checkbox (Use SSL)
- Time Out: depends on how long the system tries to login the email account (Ex:15)
- Security Protocol Type: need to test one by one to match the security protocol with the email
- Domain Name: use only if the user has a Microsoft account
- Default Name & Default Subject: can key in or let it empty
- Checkbox (Is email Approval?): need to tick if need to send approval via an email. Can untick if temporary remove approval sends via an email.
- After done inserting information, please press this button.
- Then you set to go.

- Now, you go to the email template.
- Choose the Doc Type that you want to edit
- For an example : I chose QT for EDIT
- Double Click it

17. Then this prompt out

18. Then you need to click the .
19. You will see this ![]()

20. Where you find the token, you need to go to the WEB-API then you click “Main” > “Database Configuration”.

21. Then you select the company you want.

22. Press the ![]() .
.
23. Then when this prompt out.

24. You are successfully copied the token.
25. Now go back to the Email setup template.
26. Paste the token that you have already copy in the token bar.

27. Then it will generate the link at the link bar.
28. Go to ![]() and check on the link on the most bottom part you will see .
and check on the link on the most bottom part you will see .

29. You need to paste the script in the link bar.

30. Then you off to go.
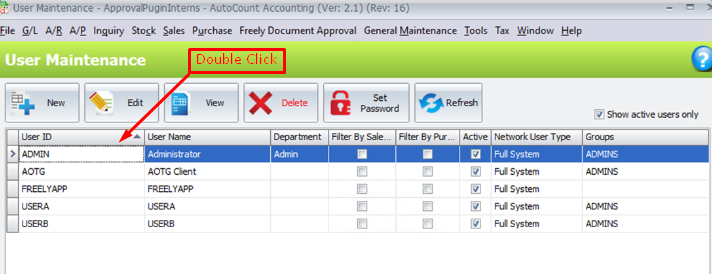
Set User Email #
How to set User email
- You need to go to the General Maintenance >> User Maintenance.
(For an example I using “ADMIN” as a user) Double click on “Admin”.
2.This will be prompting out.

3.Enter the admin email.

5. Then you are done to go.
6. When you click “Approve”, it will show “Email Had Sent!”

7. Then you can received the document in your email.
Output Email #
This is the Email that you receive when you click ” Save “

A. This is the Report outcome if you tick the Send With Report (![]() ) at Email Template Setting
) at Email Template Setting
B. This is the ExternalLink if you tick the Send With ExternalLink(![]() )at Email Template Setting
)at Email Template Setting
C. This will output the quotation main product description. From

Credit By : Webstation


