REGISTER ERP
ERP Name : AUTO COUNT SDN BHD
Client Secret Expiration : 3 Year
Primary ERP System : Yes
ADD INTERMEDIATE (Live)
TIN : C20239710060
BRN : 200601031841
Name : AUTO COUNT SDN BHD
How to Register for MyInvois Portal
1.Browse to MyTax website.
*Interface might differ slightly as this guide is based on Sandbox environment.

2.Select ID Type and key in your ID and click “Submit”.

3.It will prompt you that your “Digital Certification not exist”. Just click on the “MyInvois” button to proceed.

4.It will prompt you for Information Verification, to verify your current email. Click “Yes” if the email is the correct email.

5.Click on the “Submit” button to submit your first-time login application.

6.After clicking Submit, a PIN No registration will be sent to the specific email.

7.Login into your email, you will find an email from IRBM to activate your login. Click on the activation link in the email.

8.It will open a webpage and ask you to key your ID type and ID again. Click “Submit” after you key.

9.You are then required to create your password for this login. Key in your password and security phase. Also tick “I agree” for the terms and condition section and finally click “Submit”.


10.After a few seconds, a success message will appear. Click “OK” to proceed.

11.It will prompt you back to the main login. You may login again.


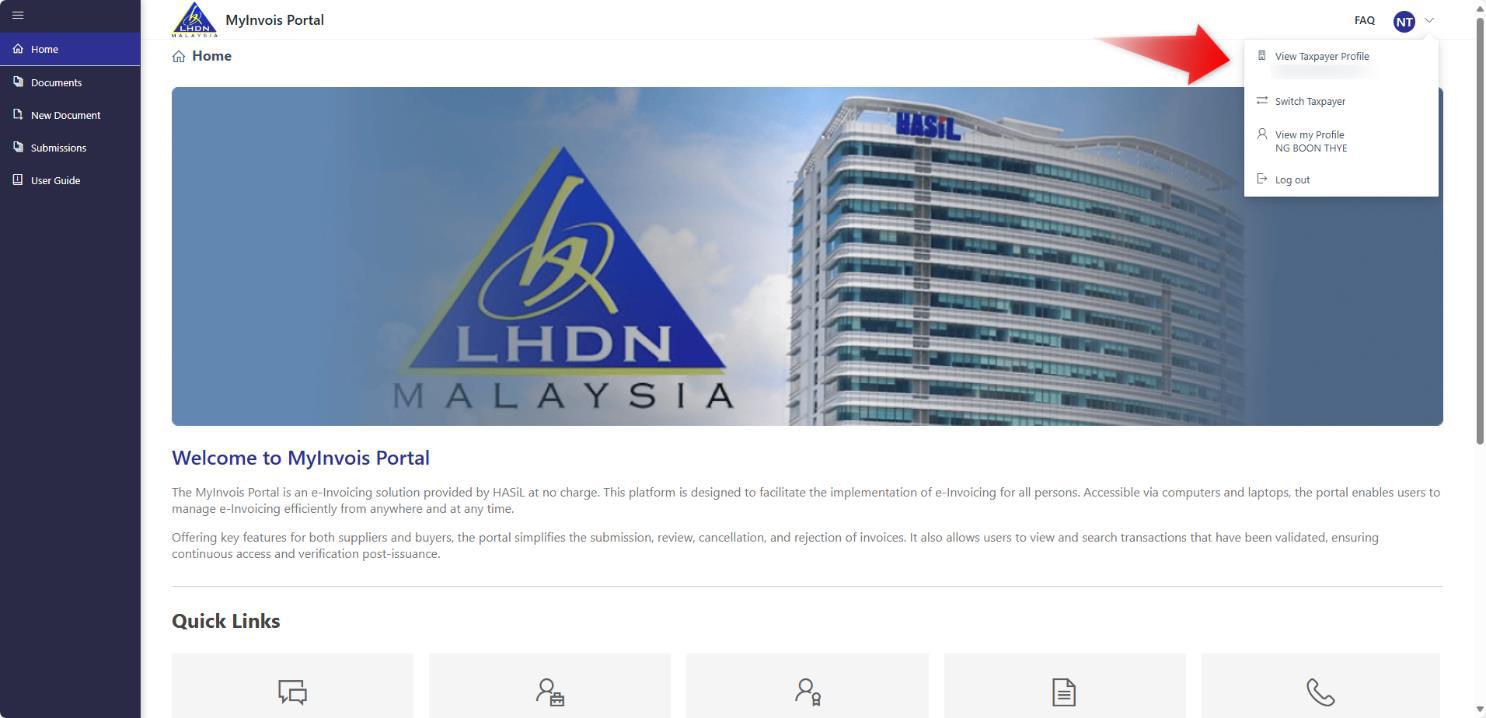
How to Link Your Company in MyInvois Portal
1.You will need to link your company to your profile. Click on the User icon on the right → Role Application.

2.Fill in the required info. You will need to upload supporting documents at this step. Once you’re done, click Submit.

3.It will prompt you to key in your password again. Key your password and click “Signature”.

4.A success message will appear and you can now proceed to access your company.

5.Go back to MyTax home page and you will then be able to access your company from there.


6.After linking your company, go to MyInvois Portal and setup your company / taxpayer profile.

7.It will prompt you for first time self-register taxpayer profile page. Scroll to the bottom and tick accept on the terms and condition check box and click “Continue”.
*If this does not prompt, you might want to wait for some time because it is not updated into MyInvois Portal yet.

8.Check your taxpayer profile details, key in any blank mandatory fields if required. Once you’re done, click “Save”.

9.Next will be your user profile, key in your email and click “Save”.

10.At last, it will show you a registration complete page. Click “Finish Setup” to proceed.

11.You will then be directed to your company MyInvois Portal page.

How to Add AutoCount as Your Intermediary
This is to set your company allowing AutoCount to submit on behalf for your company e-Invoices.
1.Access MyInvois Portal. Please make sure you are in your company profile to do this.

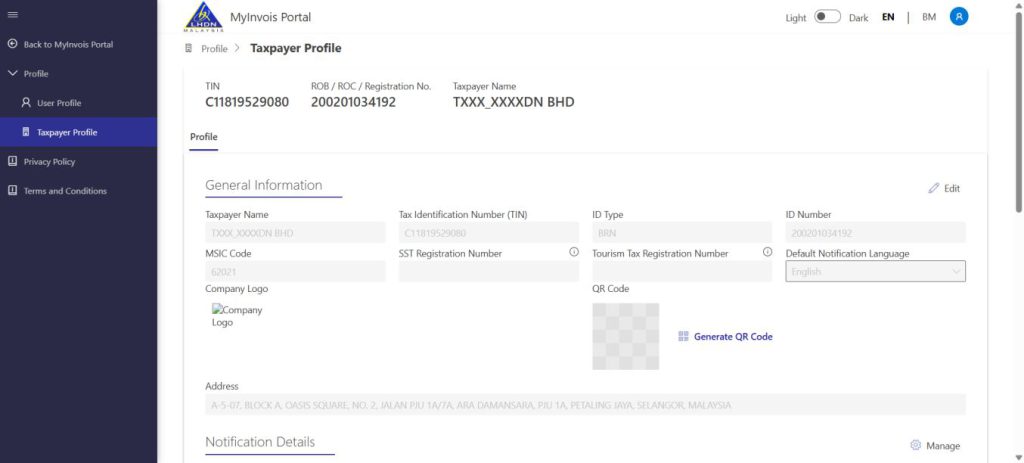
2.At MyInvois Portal, click on “Taxpayer profile”.
*For First time login, just go through some first-time setup steps like agreeing Terms and Conditions and verify profile info.
3.At the Taxpayer profile, scroll to the bottom. There is a table for you to add Intermediaries. Click on the “Add Intermediary”.

4.Key in your intermediary TIN, BRN and Name. In this case, you may key in AutoCount’s info here:
TIN: C20239710060
BRN: 200601031841
Name: AUTO COUNT SDN BHD
Click on the “Search button” after you key in the info.

5.Click “Continue” to proceed. You can set the effective date and permission for the intermediaries. Save the intermediaries when done.

6.You can now setup your own company account book in AutoCount and submit e-Invoice.
How to Register AutoCount as Your ERP System
This is to generate a unique ID that represents your company and apply into AutoCount.
1.Access MyInvois Portal. Please make sure you are in your company profile to do this.

2.At MyInvois Portal, click on “Taxpayer profile”.
*For First time login, just go through some first-time setup steps like agreeing Terms and Conditions and verify profile info.

3.At the Taxpayer profile, scroll to the bottom. There is a table for you to add ERP. Click on the “Register ERP”.

4.A dialog will appear. Type in ERP Name, for this case we can type “AutoCount Accounting 2.2” (any name will do) and choose the Client Secret Expiration “3 Years”. Then click “Register”.

5.It will then prompt a dialog to show your Client ID and Client Secret. Please copy this and save for your own storage, this will be needed to key in AutoCount later for validation.

6.After you had copied, tick on the check box to confirm you had copy and click “Done”. Your ERP table should also be updated with the name you provide just now.

7.Login to your AutoCount Accounting (at least version 2.2 Rev 5 and above), make sure you had enabled e-Invoice Module, then go to General Maintenance → Company Profile → e-Invoice tab. If you had not selected your Tax Entity / TIN profile, do select it.

8.Key in your Client ID and Client Secret 1 as copied just now. Then click “OK”.

9.It will prompt you a message to generate a new AIP Company ID if your account book does not have one. Just click “Yes”.

10.A success message will appear after that. If you faced any error, you might need to look for your AutoCount software vendor for troubleshooting.

11.You can now use your AutoCount to submit e-Invoice.
How to Add a Representative (Optional)
This is to set another individual to access your company’s MyInvois Portal.
1.Login to MyTax website using director’s login.

2.Access to your company by clicking on the Role Selection → Select your company.

3.You will notice the profile will switch to your company.

4.To assign representatives, click on the right-side User icon → Select Appointment of Representative → Select ID Type (IC) → Key IC Number → Click submit. Make sure the IC / individual register at this portal first.

5.It will prompt for your password for confirmation. Key in your password and click “Signature” to proceed.


6.That IC / individual login will then be able to access this company’s MyInvois Portal.

How to set permissions for Representative (Applicable if add representative)
This section is to guide how can you set permissions for representative. Refer to this section only if you add representatives to access your company.
1.Login to MyTax website using director’s login.

2. Access to your company by clicking on the Role Selection → Select your company.
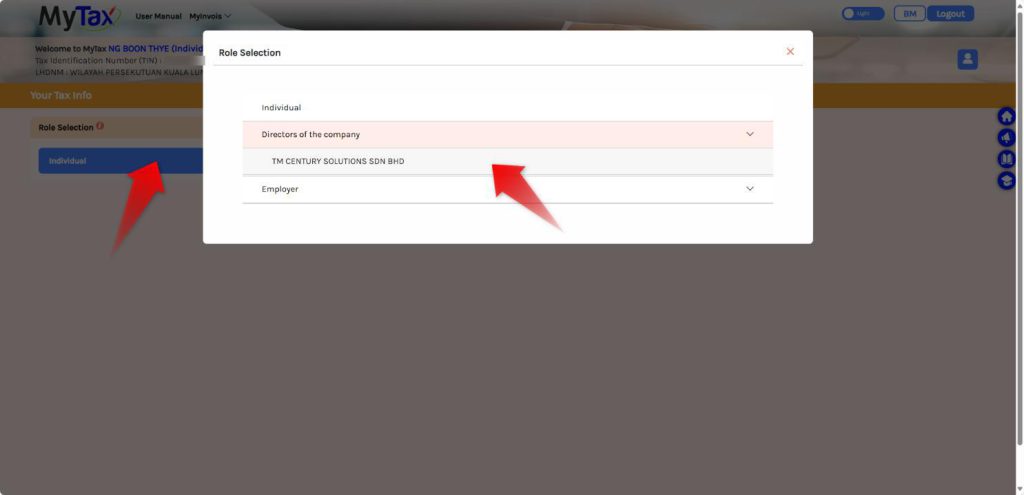
3. Access to your company by clicking on the Role Selection → Select your company.

4. Browse top MyInvois > Preprod to access your company MyInvois Portal.

5. At MyInvois Portal, click on your Taxpayer Profile.

6. Make sure it shows your company profile. If not, you might need to click on the “Switch Taxpayer” to access the correct profile.
7. Scroll to the bottom “Representative” section. You will see a list of representatives that you had added to access your company.

8. On the person that you wish to set the permission, click on the triple dot button > Edit Permissions.

9. A small window will appear. Click on the “Permissions” and set your permissions accordingly. Remember to click “Save” after you assign all the required permissions.

10. Click on the cross button “X” on the top right of the small window to close. You are done and good to go.
How to Enable e-Invoice
How to Set Up Company Tax Entity & Link to MyInvois Portal
How to Create a Tax Entity for a Local Company
How to Create a Tax Entity for a Foreign Company
How to Create Tax Entity for a Government Entity
How to Create a Tax Entity for an Individual
How to Create a Debtor & Its Tax Entity (Express)
How to Retrieve Customer Information Using Get TIN Function
How to Get TIN from a Batch of Customers
How to Import Tax Entities via Excel
Import Tax Entity Excel File
Key Setup Steps for Item Maintenance
How to Update Item Maintenance with the Easy Item Function
Overview of Approval Workflow
How to Send a Standard E-Invoice
How to Handle Buyers Who Do Not Require an E-Invoice
How to Handle Export/Overseas Buyers
How to Handle Government Buyers
How to Handle Items That Must Generate an E-Invoice
How to Handle Backdated Invoices
How to Handle Marketplace Transactions
How to Cancel an E-Invoice
How to Send a Credit Note E-Invoice
How to Handle Cash Sales Scenarios
How to Perform Batch Approval for E-Invoice Submission
How to Track and Trace Transaction Status History
How to Handle Self-Bill for Commission Payments
How to Handle Self-Bill for Importation of Goods
How to Send a Self-Bill Credit Note
How to Perform Consolidated Self-Billing
How to Perform a Consolidated E-Invoice
How to Check E-Invoice Submission Status
How AutoCount Handles Relaxation Periods
How to Share Your Company Information
How to Add a Validated e-Invoice QR Code to Your Invoice Printouts
1. MyInvois Portal Website Link和注册步骤
2. MyInvois Portal 如何连接你的公司
3. MyInvois Portal 如何添加中介
4. MyInvois Portal 如何添加或注册ERP System
5. MyInvois Portal 如何添加负责人
6. 如何启用 E-Invoice
7. 如何设置公司的Tax Entity并连接至MyInvois Portal
8. 如何为本地公司创建Tax Entity
9. 如何为外国公司创建Tax Entity
10. 如何为政府机构或部门创建Tax Entity
11. 如何创建个人Tax Entity
12. 如何为Debtor创建或更新Tax Entity(简易版)
13. 如何用Get TIN获取顾客资料
14. 如何用Get TIN一次获取多个顾客的资料
15. 如何用Excel Import顾客的Tax Entity
16. 设置Stock Item Maintenance的步骤
17. 使用Easy Item功能更新Stock Item Maintenance
18. Standard E-Invoice审批流程(Approval Workflow)
19. 如何开Standard E-Invoice
20. 如何应对不需要E-Invoice的顾客
21. 如何开E-Invoice给出口贸易或海外的Buyer
22. 如何开E-Invoice给政府Buyer
23. 如何处理售卖需要开E-Invoice的商品
24. 如何处理补开的invoice (Backdated)
25. 如何处理电商平台 (Marketplace) 的交易和E-Invoice
26. 如何取消E-Invoice
27. 如何开Credit Note E-Invoice
28. 如何处理Cash Sale E-Invoice
29. 如何一次性批准多张E-Invoice (Batch Approval)
30. 如何查看Document Status Change Log
31. 如何开Consolidated e-Invoice
32. 如何处理Commission Payment的Self-Billed E-Invoice
33. 如何处理进口(Import)商品的Self-Billed E-Invoice
34. 如何开Self-Billed Credit Note
35. 如何开Consolidated Self-Billed E-Invoice
36. 如何查E-Invoice提交进度 (Submission Status)
37. 宽限期 (Relaxation Period) 的处理方法
38. 如何共享公司Tax Info
39. 如何添加Validated E-Invoice QR Code
After completing this step, please contact us on WhatsApp to proceed with the next step.


Credit By : Webstation